Friday 29 May 2015

Couscous Salad

This is a super easy quick salad to make for lunch or dinner. There are not to many ingredients to get worried about and you can pretty much make it up as you prepare. This time I wanted to keep the salad simple so that the kidlets would eat it.  

Cook the couscous according to the package. I simmered the couscous in low sodium chicken broth to give it a bit of flavour. Once the couscous is done, take the prepared couscous and place it in a large bowl to cool down a bit. 

In the meantime you can slice and dice whatever herbs and veggies you want to add. In this case I chopped fresh parsley, tomatoes, and green onions. I also drained and rinsed a can of chickpeas. 

Once the couscous has cooled down, place all the veggies and herbs in the bowl and stir to combine. At this point I had a lemon so I grated the lemon rind and added it to the couscous mixture. This gave the salad a more summery zing. I gave it one more stir to  ensure the lemon rind was distributed well. You can add a bit of salt and pepper if you like. Also if you have a homemade salad dressing, drizzle just a bit of that over the top and toss to add more flavour. 

This is a no fuss salad with plenty of healthy fresh options.

Have a good weekend everyone! - JD   

Thursday 28 May 2015

Honey Garlic Sauce


After standing in the aisle at the grocery store reading the label on a bottle of honey garlic sauce, I decided to make my own sauce, considering I had most of the ingredients, except the garlic, at home. I thought it should be a pretty straight forward sauce probably without much fussing. So I ditched the convenience and headed to the cookbooks instead.   

Honey Garlic Sauce
----------------------------------------
1/2 cup of honey
1/4 cup low sodium soy sauce
1/4 white vinegar
2 to 3 cloves of garlic, crushed
2 tablespoons dark brown sugar
1 teaspoon of baking soda
a pinch of salt

Preheat the oven to 400ºF.

Line a baking tray or baking pan with aluminium foil or parchment paper. 

In a large bowl combine the honey, soy sauce, vinegar, garlic, brown sugar, and salt.

Stir until the honey and sugar are dissolved. Once dissolved stir in the baking soda.  

The mixture will foam... or froth up like a science experiment. This part reminds me of when you make cinder toffee.  

Place the pork chops in the bowl, one at a time if you like, turning to coat both sides. 

Place the pork chops on the prepared baking pan and spoon over with the remaining sauce.

I guess when I said spoon over I really meant smoother with the remaining sauce.  


Place the baking pan with the generously coated pork chops in the oven for about 45 minutes to 1 hour or until meat is cooked all the way through. Covering the top of the pan half way through the cooking time. 


Notes: This sauce would be great over ribs, chicken, tofu, kebabs, and beef. I lined my pan, to hopefully save on mess, although most of the sticky sauce went underneath the aluminium foil. Next time I might try a baking sheet/tray. Before covering half way through the cooking time you could spoon the sauce from the baking pan over top of the pork chops, like what you do when basting a turkey.  


Wednesday 27 May 2015

Double Chocolate Peanut Butter and Strawberry Ice Cream

We were busy over the weekend making ice cream. My son made chocolate with peanut butter and mini dark chocolate chips and my daughter kept it simple by making strawberry. Both flavours tasted great however both feel that the ice cream my son made was the more flavourful of the two. As my daughter says "his ice cream is so yummy!" Homemade strawberry ice cream taste quite different than strawberry ice cream one is used to purchasing. Just pure mashed up fresh strawberries. We did add a tiny drop or two of red food colouring to make the ice cream a pale pink colour just to enhance the strawberry experience.    

Although I am a fan of fruit ice creams, the double chocolate peanut butter tasted amazing and is the most sought out flavour at dessert time. My son wants to make peanut butter bacon ice cream next and as for my daughter she would like to make peanut butter and jam ice cream. I would like to make rum raisin for my husband. 

The first batch of ice I made, vanilla chocolate chip, was semi soft whereas these two were a bit more firm. Which really isn't a huge problem. I just had to take the ice cream out of the freezer a few minutes before serving.     


Rather than fuss with melted chocolate or use chocolate syrup I found chocolate sweetened condensed milk which made things simpler. We used all natural salt free peanut butter  and of coarse mini dark chocolate chips.


Double Chocolate Peanut Butter Ice Cream
----------------------------------------------------------------
1 pint of whipping cream or heavy cream
1 can (14 oz) of Chocolate Sweetened Condensed Milk
3 to 4 tablespoons all natural salt free peanut butter
1/4 cup of mini  dark chocolate chips

Place the whipping cream into a large mixing bowl. Using a hand held mixer whip the whipping cream until soft peaks form.

Then add the whole can of flavoured, in this case chocolate, sweetened condensed milk and peanut butter. Blend until thick.

Using a spatula gently fold in the chocolate chips until incorporated.

Then transfer to a clean freezer friendly plastic container. Cover and freeze for 6 hours.

Sunday 24 May 2015

Food Photo of the Day ~ Saturday Pizza Night

Often on Saturday evenings we have pizza night. We make the dough, we pick the ingredients and we assemble our delicious humble pizza pie. Making homemade pizza is an easy way to get the kidlets into the kitchen and control fat and salt levels. Also it is great way to use up leftover pasta sauce and those remaining veggies that are at the week's end.    

Here is my daughter lending a hand and putting her touches to one of two pies we created.  

You need a fair bit of muscle to cheese this pizza and she does such a great job!  

Food picture of the day may be a regular permanent post here. I can see it being more of a random post than an everyday post. It sort of goes hand in hand with my random (food) thoughts. Ultimately, it is just another way for me to share. 

Enjoy the sunshine everyone! - JD 

Friday 22 May 2015

Métis Cookbook


Unfortunately this is the only Métis cookbook I own. I am a bit surprised that there aren't more Métis, Aboriginal or Canadian cookbooks. There are many things we can learn from ancestral, regional, provincial cuisine. Food history... or the history of food is important to culture, identity and acceptance. Not only "you are what you eat", you are what you cook and bake. It is our first memories of food and the home kitchen that carry us through holiday seasons, special get togethers, and daily life. Passed down from generation to generation. The sharing of food, stories and laughter and the most powerful... smell. Those strong culinary memories, whether homemade or pre-made, gives us our culinary inhibitions to go forward with positive energy to create and re-create inside our kitchen. To feed our families and friends. 

This cookbook was created by the National Aboriginal Health Organization and the recipes are more modern with a traditional flair. This book is a testament to the Métis mothers of the past who always found a way to throw together a great meal. Who chose ingredients solely based on the seasons and what was at hand. They relied on hunting, gathering, farming, and fishing and in harsh winter conditions canning preserves were their staple. They had a more practical way of looking at food.

The Métis cookbook has great information, helpful tips and the recipes are broad so there is something for everyone. Under the Teas and Home Remedies chapter there is a sub chapter called Aboriginal Healing which I really like. I wanted to share these two recipes from the cookbook:   


Tangy Coleslaw
------------------------------------------------------
In a bowl place:

1/2 cup light mayonnaise
1/2 cup apple cider vinegar
1 to 2 teaspoons white sugar
4 teaspoons dill seed
salt and pepper to taste
1/2 head of shredded cabbage
1 each green, red, and yellow pepper, diced to thinly julienned
3 green onions, sliced


- Whisk together mayonnaise, vinegar, sugar, dill, salt and pepper.
- Mix together shredded cabbage, peppers and green onions.
- Toss with dressing.
- Refrigerate until ready to serve.  


This recipe is quite unique so I wanted to share it too...


Dandelion Syrup
---------------------------------------------
Makes 4 cups

50 Dandelion flower heads, untreated with chemical spray
1 lemon
8 cups water
5 cups white sugar

-Put dandelion flower heads in a large sauce pan.
-Squeeze in the juice out of the lemon and add water. Bring to a boil.
Cover and simmer for 1 hour.
- Remove from the heat and let stand over night, covered.
- Strain, return the liquid to a clean saucepan, and add white sugar.
Stir well and bring to a boil.
- Reduce heat and simmer for 1 and 1/2 hours or until it reaches the consistency of maple syrup.
-Store in a sealed, sterile jars in the refrigerator. Serve over waffles or pancakes. 


Wednesday 20 May 2015

Super Easy Ice Cream


Basically this ice cream has 2 ingredients and I just happened to have those 2 ingredients. This recipe is super easy, hence the name, and is great for kids to make too. Plus, it gives anyone a chance to be creative in developing an ice cream flavour. Because it was my first time making ice cream this way, I do have a very good quality ice cream maker, I kept the flavour basic. However we did have fun at the dinner table discussing which flavours we want to create. I would say the texture is a semi soft creamy ice cream. Which melts in your mouth beautifully. 


To make this super easy ice cream you will need the following ingredients:

1 pint (473ml) whipping cream/heavy cream
1 can (14 oz) of sweetened condensed milk
1 teaspoon ground vanilla bean - optional
1/2 cup mini chocolate chips - optional


First, pour the whipping cream into a large bowl and using a hand held mixer blend until soft peaks form.


Once the soft peaks have been established add the condensed milk. Mix until thick and well combined.  


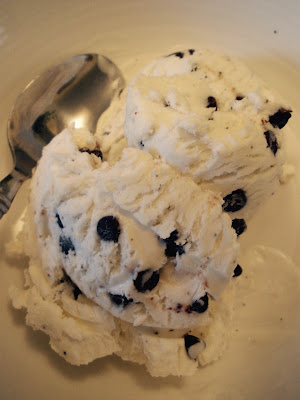
The ice cream mixture should look like this. Nice, thick, and creamy. 


Now it is time for the fun bit... creating an ice cream flavour. I added ground vanilla bean and mini chocolate chips. However the possibilities are endless so be creative and fun. Using a spatula stir until the ice cream mixture and flavours are combined. 


Pour the flavoured ice cream mixture into a freezer safe container cover with cling film and place the lid on. Freeze for about 6 hours.  


After 6 hours the ice cream should look like this. Solid and firm... and ready to eat. 


A perfectly delicious scoop every time! 


Friday 15 May 2015

Potato and Watercress Soup

We made this lovely soup. The recipe is fairly easy, if you can mind chopping the watercress, and even the kidlets helped out. My daughter added a bit more pepper, at her brother's request, which made this soup more peppery in flavour than expected. Regardless, it was quite flavourful.

 
Potato and Watercress Soup
--------------------------------------------------------
2 tablespoons vegetable oil
2 potatoes peeled and cubed
1 onion, chopped
1/4 teaspoon salt
1/4 teaspoon pepper
2 and 1/2 cups chicken stock
2 and 1/2 cups milk
1 and 1/2 pounds watercress, semi chopped with stems remove
watercress leaves for garnish

Heat the oil in a large stockpot over medium heat. Add the potato and onion and stir to coat in the oil. Add the salt and pepper. Reduce to medium heat. Cover and heat for 5 minutes. Occasionally stirring to prevent the potatoes and onions from sticking and the pan browning too much. Do not panic a little browning is fine... call it seasoned flavour. 

Pour chicken stock and the milk, bring to a boil, reduce heat to low and simmer for 10 minutes, or until the potatoes are tender. Stir in the watercress and simmer, uncovered, for 4 to 5 minutes, or until watercress is just cooked.

In small batches, transfer the soup to a blender or food processor and purée until smooth. Return the soup to the pot, season to taste. Ladle into individual bowls or place in refrigerator if not serving immediately. I used a handheld blender therefore no transferring required. I removed the pot from the burner and when finished blending returned the pot back to the burner. 

You can serve each serving with a dollop of whipped cream, if desired and garnish with a bit of watercress leaves. 

Today is Food Revolution Day. I signed the petition, have you? Feeling much better today just in time for the long weekend. Enjoy the long weekend everyone! - JD 

Thursday 14 May 2015

Leftovers #18 ~ Bean Dip

What to do with leftover black beans in the refrigerator... make bean dip. It is rare that I have leftover beans because they are usually used in salads, stir-fry and most casseroles.  

To make this easy bean dip you will need just a few ingredients and a blender. 

Place what ever leftover beans you have in a blender. Then add a little bit of low sodium  vegetable or chicken stock, just enough to moisten, about 2 tablespoons, adjust accordingly to the amount of beans. Add a favourite seasoning, like Cajun or Roasted Red Pepper. Blend everything until smooth. If need be you may have to add a bit more chicken stock. You want the bean mixture to be firm and smooth with a bit of fluidity but not watery.


Once smooth... pour it into an oven proof baking dish and bake in a pre-heated 350ºF oven until hot and bubbly, roughly 20 to 30 minutes. A good indicator that the dip is done is when the top has lost it's gloss and is matte and starts to pull away from the sides. Chances are the dip is ready and hot! I like to dress it up a bit. I add grated cheese on top and pop it back into the oven until the cheese melts. I carefully remove it from the oven adding sliced green onions. Olives and fresh chopped tomatoes are great to!     

You don't have to wait until you have leftover beans to make this dip. It can be made at any time with most canned beans.    


Wednesday 6 May 2015

Hummus


I have tried many hummus recipes. Some with much success and others with much less. Hummus is a great dip to have with vegetables, crackers, or multi-grain corn chips. Also it is fabulous on burgers (veggies or meat), toast, and sandwiches. A healthier snacking choice that contains 20 Amino Acids, has many minerals, rich in Vitamin C and B6, offers good fat from the Tahini paste and is about 30-40% protein when made homemade. Store made hummus might not be as healthy. 

Armed with a blender and only 5 to 7 easy ingredients you will have a lovely snack in no time. Positively tasty, this hummus recipe is simple and in my opinion one of the best
   

Hummus
------------------------------------
1 can of chickpeas or Garbanzo beans (drain only half of the water)
1/4 cup Tahini (sesame seed) paste
1 clove of garlic, crushed
1/2 teaspoon of salt
1/4 teaspoon of cumin
1/4 teaspoon of chili powder
1/4 cup lemon juice to taste

Blend all the ingredients together in a blender or a food processor for about 3  minutes or until smooth. Place in a serving bowl and drizzle with olive oil, lemon juice, and paprika.

Notes: Alter the amounts of cumin and chili powder according to your taste. Try other herbs or spices. Try adding roasted red peppers. 

It is Wednesday and we have been granted with snow. Thick. Heavy. Slushy snow. - JD 

Tuesday 5 May 2015

Oven Roasted Chicken Kebabs

Since we do not have a barbeque and I wanted to make kebabs I thought I would try my hand at oven kebabs. How different could it be roasting the kebabs in the oven than barbequing them. I suppose the smoky barbeque flavour. Nothing beats that aroma. Regardless, this recipe is easy and so simple you can enjoy them all year round. Who needs a barbeque or to wait for barbeque season. 

I had the chicken and vegetables marinating, separately, for 5 hours. You do not have to marinate for that long... 2 hours will do. I made a homemade marinade of oil, lemon juice, herbs, and spices.  

Line a large baking tray with parchment paper. Place the kebabs on the lined tray, in a row, and bake in a pre-heated 400ºF oven for about 30-40 minutes or until meat is fully cooked. You can turning them once or twice or about every 10 minutes. I find roasting them at a higher temperature seals in the juices and almost mimics that grilled flavour. Roasting them at a low temperature allows the juices to run out. When done remove the tray from the oven and serve. 

Notes: You can use whatever meat you like. Tofu works great for kebabs too. 

They were enjoyed by all. I served the kebabs with a side of couscous and a lovely leafy green salad.  

Hope everyone had a good weekend, we did! - JD

Friday 1 May 2015

Dandelion Tea


Trying dandelion tea came as a suggestion to me and one that I thought I would regret. Contemplating tea in the aisle at my local organic shop had me a bit hesitant. The last time I switched brands because I thought almost all teas were created equal, I got a bit of a surprise to say the least and vowed never to stray again. Although in hindsight it probably would have cured whatever ailed you. My thoughts were that I did not need curing that bad. Reluctant as I was, I did purchase a box. That afternoon we brewed a pot. No strong odour and no yellow colour that is forever assoicated with the incessant backyard weed. The teacup went from table to nose with little avail. No fowl herbal decoction passed through my nostrils. The warm teacup then pressed against my lips. I paused, then inhaled one apprehensive sip. The nutty mallow flavour was pleasing to my preconceived palette. Relieved, we relaxed and enjoyed the herbal refuge to our afternoon.   

After some research there seems to be many benefits to drinking dandelion tea. 

- helps digestive disturbances

- reduces inflammation

- helps reduce cholesterol

- contain antioxidants

- packed with vitamins and minerals

- relieves bloating and water retention

- helps rheumatism and arthritis 

- boosts immunity 

And these are just a few. 


Have a good weekend everyone! - JD