Wednesday 25 December 2013

Christmas 2013


Christmas Eve: We did a traditional full on English fry up for dinner. I opted for half of the full on, pictured here. Which was more than enough. I found a few grocery stores here in E-town that carry *British* baked beans and yes there is a difference. They are not as sweet as the ones that are regularly sold here. Also I found a deli which sells Cumbria sausages.   


For dessert we had a slice of date, prune and fig cake from Fortnum and Masons called Ambrosial Alchemy and it most certainly was! It was quite lovely. A cup or two of Classic Earl Grey hit the spot nicely before watching A Christmas Carol with Alastair Sim. 


Christmas Day: We started the morning off with a round of Bucks Fizz and a lovely mincemeat pie, dusted with gold on top, from Fortnum and Mason's. The pie was from their Three Kings minced pie collection. I could really not resist having these for breakfast. Especially this one that had the fragrance of rose.   


The midday meal was roasted pheasant with roasted veggies and stuffing. The pheasant was wrapped in slices of bacon to seal in the moisture. A Chateauneuf - Du - Pape was the wine of choice. It was satisfying to have the major meal midday. That way digestion was slow and a walk was gratifying.   


And later on if you were feeling a bit peckish then mixed kale dressed with a raspberry vinaigrette, slices of Lancashire cheese, malted biscuits and a slice of Melton Mowbray / Pork Pie kept the hunger at bay.

It was a great day to relax. Hope you had a wonderful Christmas everyone! - JW  


Monday 23 December 2013

Chocolate Fudge


I did make it back into the kitchen to whip up a batch of fudge. This time chocolate. And as you can tell from the photo I have had some success.  The recipe is from the cookbook I feature a few days ago called Christmas Candy. This recipe although it may seem intricate is pretty easy and was a breeze to create. I still do not have a candy thermometer however my kitchen intuition kicked in nicely. So far this recipe is the simplest and easiest. 

Old-Fashioned Chocolate Fudge
---------------------------------------------------

2 ounces unsweetened chocolate
1 cup of milk
2 cups granulated sugar
1 tablespoon light corn syrup 
2 tablespoons unsalted butter, at room temperature
1 teaspoon vanilla extract
1/2 cup finely chopped walnuts

*Notes: I did not have corn syrup so instead I used golden syrup. Also I omitted the walnuts. 

Grease an 8 inch pan with butter.

In a large, heavy saucepan, combine the chocolate and the milk. Cook over low heat, stirring constantly, until the chocolate has melted and the mixture is smooth.

Stir in the sugar and corn syrup. Increase the heat to moderate and continue stirring until the mixture comes to a boil.

Cover the pan and cook for 1 minute. Uncover the pan and insert a candy thermometer. Cook, uncovered, without stirring, until the mixture reaches the soft-ball stage. (236ºF on the candy thermometer). Note: Since I do not have a candy thermometer I used my mum's method of dropping a bit of the boiling mixture into a glass of cold water until it form a soft- ball. 

Remove the pan from the heat and stir in the butter and the vanilla. Set aside until the candy cools to lukewarm (110ºF). Note: Once the top of the fudge in the saucepan looked less glossy and when tipping the saucepan the fudge looked like it had a skin on top, I started to beat it with a wooden spoon until it thick and creamy. 

With a wooden spoon, beat the fudge until it is thick and creamy and no longer glossy. Quickly stir in the nuts.

Pour the fudge into the prepared pan. Cool in the pan on a wire rack. 

When the fudge is firm and completely cool, cut into squares.

Hope you had a great weekend! - JW  


Saturday 21 December 2013

What Did I Bake?


Seems like I got a little distracted in the kitchen and made mincemeat tarts instead.

Enjoy your weekend everyone! - JW  

Thursday 19 December 2013

Christmas Candy

Christmas time has it's usual suspects at the dinner and dessert table. Wade through all the mincemeat tarts, fruit cake, shortbread, and rum balls and seemingly there is supposed to be a cornucopia of Christmas candy. My mum never made candy at Christmas probably because she made fudge periodically throughout the year. 

This cookbook is only 63 pages has no index just a table of contents which in most part acts as both. There is a simple and brief introduction regarding making the best candy, storing candy and packaging candy and other confections. Charming Victorian inspired holiday illustrations. Classic recipes such as almond clusters, pralines, peppermint creams, peanut brittle, fudge, salt water taffy and popcorn balls.

Last night I attempted to make the fruit fudge. I say attempted because I have tried on occasion to make this confectionary goodness only for my efforts to be a bit on the disappointed side. Although in my defence I think having a candy thermometre would help, slightly. My mum never used a candy thermometer and her fudge was fabulous every time. So much so that it would be purchase even before hitting the school's bake sale table.  

I found a recipe, from this book, to be nearly fool proof. The fudge did turn out. That said, I think a tweak here or there on my part, could make it better. I will go back to the kitchen at some point today and have another go. In the meantime I will share the recipe from the book so that you may try.

Fruit Fudge
----------------------------------------

2 cups granulated sugar
1 cup milk
1/4 cup unsalted butter
1 teaspoon vanilla extract
1/2 cup mixed canned fruit, coarsely chopped
**candied cherries may be substituted for the mixed fruit

Grease an 8 inch square pan with butter.

In a large heavy saucepan, combine the sugar, milk, and butter. Cook over high heat, stirring constantly, until the sugar dissolves. Reduce the heat to moderate and continue to cook, stirring constantly, until; the mixture comes to a boil.

Cover the pan and cook for 1 minute. Uncover the pan and insert a candy thermometer. Cook, uncovered, without stirring, until the mixture reaches the soft-ball stage (236ºF on the candy thermometer). 

Remove the pan from the heat and stir in the vanilla. Set aside until the candy cools to lukewarm (110ºF).

With a wooden spoon, beat the fudge until it is thick and creamy and is no longer glossy. Quickly stir in the fruit.

Pour the fudge into the prepared pan. Cool in the pan on a wire rack. When the fudge is firm and completely cool, cut it into squares. 

Notes: Because I do not have a candy thermometer I had a glass of cold water beside the saucepan and periodically took a small spoon with a small amount of the fudge as it cooked and tipped it into the water to see if it would form a small soft ball... hence the term "soft-ball stage". Probably not the most effective way however that is how my mum tested her fudge. And it turned out every time. 

Hope everyone is enjoying the week so far. - JW 


Monday 16 December 2013

Roasting Chestnuts

This weekend we roasted chestnuts. Something I have never done before. First we rinsed the chestnuts because they were packed in peat. Then laid them to dry. Then scored the tops. It is very important to do this or else they will explode in the oven. Placed them on a baking sheet, in a preheated 400ºF oven and bake for 20-30 minutes.


Shelling them was fun and everyone helped. They were quite meaty in size and in texture. And of course some peeled easily than others. The hues of brown to golden brown were appealing and their warmth mouthwatering.

Hope you had a good weekend! - JW   

Friday 13 December 2013

Spaghettini with Cheesy Chicken Meatballs


Usually when a particular week is busy that might mean dinner has to be simple and quick. And what better meal than a Spaghetti Bolognese. However as the snow fell my mind drifted and I changed the dinner plans to meatballs instead. The last time I made meatballs I did them stove top and the aspect of frying them consumed much time. These are a breeze to make and taste delicious. 20 minutes in the oven. Easy!  


To make these delicious or as my daughter said... scrumptious, baked meatballs you will need the following: 

1 package of ground chicken 
1 egg
1/2 cup breadcrumbs or your favourite butter crackers smashed into tiny bits
1/2 cup grated sharp cheddar cheese 
2 teaspoons of basil
1 teaspoon of oregano
1 teaspoon of garlic and herb Mrs. Dash
1 teaspoon parsley 
a pinch of salt
a dash of pepper
1/4 cup cornmeal (or bread crumbs) to roll the meatballs in. 

First preheat the oven to 400ºF and grab a baking sheet and line it with parchment paper.

Mix all the ingredients in a large bowl. Using your hands form into rounds no bigger than a walnut.

Take the cornmeal and place on a plate. Roll each meatball in the cornmeal and place on the prepared baking sheet. 

Bake in the oven for 20 minutes or until cooked all the way through. 

Notes: This is a recipe that has some give and take. You can always change up the herbs and spices for different ones. Try using different ground meat. Parmesan cheese or mozzarella cheese are great alternatives to old cheddar. However I think a lovely blue cheese would do just nicely too.  


Something else that is simple to make... basic tomato sauce. Empty a 720ml jar of organic strained tomatoes (passata sauce) into a saucepan. Add some basil, oregano, rosemary or herbs de provence. Add a dash of salt, a bit of pepper, crushed garlic, balsamic vinegar, olive oil, and some HP sauce otherwise known as brown sauce. Stir it all together and let simmer for about a half hour. What better way to pass the time while the meatballs are baking and the is pasta cooking. 

Wednesday 11 December 2013

Mason and Cash & Good Cook

I found a couple of items that I wanted to share with you. First is the Mason and Cash steam pudding bowl. I found this at Sears. There are three colours to choose from. Red, dark blue and cream. Although I can not quite remember the cost... I think it was $19.00 Canadian. This is the large size steam pudding bowl of the two. Do not let the photo fool you. The large size is small. However in relation to steam pudding I do not feel that there have been many enormous steam puddings served. Sometime between Christmas and News Years I am going to attempt to make steam pudding. My husband absolutely luvs steam pudding! Making one of his favourite puddings this year will be a first for me. I am excited to go full steam ahead into this venture.  

Second is the adjustable roast rack. Roasting a turkey just became a bit more easier with this product. I did purchase one prior to this one and it was not compatible with any size roaster I have. So I kept a watch out and found this at Safeway for $4.99. It is sturdy and has a bit of weight. Nobody wants a flimsy contraption that might send the turkey sliding across the kitchen floor. 

Still cold and snowing today. - JW  

Tuesday 10 December 2013

Lost Desserts


Indulgent classic desserts gives us a culinary history from legendary restaurants and famous chefs, it also gives us some insight as to dinner tables of the past. Where the presentation of a dessert was just as alluring as devouring the dessert itself. The lavish display and creating something that resembles art has not been lost. 

The author, Gail Monaghan, puts forward dessert recipes from the past. Paris restaurants, Victorian households and street vendors from New Orleans. This cookbook reads more like a who's who of desserts. While adding slightly updated versions however not straying too far from the original recipe. The 70 recipes are adapted for the home cook and range from simple to elaborate. Who can forget the Baked Alaska, Orange Chiffon Cake, Mont Blanc, Melon Surprise, Peach Melba, Soufflés, Flans and Crépes Suzette.  

This book is indulgent and nostalgic which is great to have around this time of year. As we tend to entertain and have company pop around more than usual. Depending on what your plans are and what sort of dinner you will be serving, choosing a delicious fancy dessert made by yourself is truly rewarding. - JW 


Friday 6 December 2013

Rum and Raisin Mincemeat Pies

The pie making is underway. These lovely little bites are filled with Robertson's Rum & Raisin Mincemeat.They are a bit more sharp than regular mincemeat however they were consumed with great delight.  

It is another bitterly cold day today, -36ºC! Enjoy your weekend and stay warm everyone! - JW  


Wednesday 4 December 2013

Empire Biscuits

I have been trying to make a dent in my Christmas baking. I started with shortbread and have move on to the Empire biscuit. They are a bit labour intensive however I quite enjoy that fact. These are very reminisent of the Bakewell tart which gives me a bit of comfort. I had received a manual cookie cutter with cut out shapes as a gift and wanted to put it to the test and this was the perfect recipe. 

It is considered that the Empire biscuit is traditionally a Scottish snack. The biscuit was originally known as the "Linzer Biscuit" and later the "Duetch Biscuit". However, when World War I broke out it was renamed to the Empire biscuit. 


Empire Biscuits 
------------------------------
1/2 cup (125ml) unsalted butter, softened
1/2 cup (125ml) casters sugar 
1 egg
1 teaspoon (5ml) almond or vanilla extract
2 cups (500ml) all purpose flour
1 teaspoon (5ml) baking powder
1/3 cup (75ml) raspberry jam 

Icing
---------
1 cup (250ml) icing sugar
1/4 teaspoon (1ml) almond or vanilla extract
1 tablespoon (15ml) hot water, approximately
6 candied cherries, quartered 


Notes:
----------- 
- I found that I needed to add a bit more butter so I increased the butter to 2/3 cup.

You may use strawberry or apricot jam. I used a Peach Raspberry Champagne preserve.

You can use 1-1/2 to 1-3/4 inch (4-4.5cm) cookie cutter. The cookie cutter I used was a bit smaller therefore the baking time was not a full 10 minutes. So tweak the baking times according to cookie cutter size. 7 minutes was all the time needed to bake mine. 

- You could sandwich the cookies after putting jam on the bottoms however I found it easier to icing the tops separate and then sandwich them together. 

- I know 3 hours seems long for the icing to set. Trust me they need that length of time. 


Preheat oven to 350ºF (180ºC) 

In a large bowl beat the butter with the sugar until fluffy; then beat in the egg and almond extract.

In a separate bowl whisk flour and baking powder together; then stir into the butter mixture.

On a lightly floured surface roll out dough to a 1/8 (3mm) thickness. Cut out shapes with cookie cutters. Place about 2 inches apart on an ungreased baking sheet. Bake in the oven for 10 minutes or until golden brown. Let cool completely on wire racks. 

When completely cool divide the cookies into tops and bottoms. Spread raspberry jam on the bottoms and set the tops aside. 

Time to make the icing...

In a small bowl, combine icing sugar, almond extract and enough water to make a thin icing. Spread over the tops that were set aside. Top with a cherry piece and let stand for a few minutes then sandwich the tops and bottoms together. And let the icing dry for about 3 hours. 

Tuesday 3 December 2013

Tea at Fortnum and Mason

I remember reading about this book through the Fortnum's website. Thinking what a lovely little book, with classic British afternoon tea recipes and insightful information regarding tea.

The book is only 128 pages however deals with the art of the afternoon tea, high tea, and taking tea. The photos are so inviting and the 45 recipes give more than the traditional scones, delicate sandwiches, tarts and sponge cake. Making it easy to have a bit of Fortnum's at home. There are anecdotes, stories, and the history of tea to delight and entice the even regimented tea drinker.  


This is the hamper that our dear and wonderful friend sent us for our wedding, The English Essentials Hamper. With loads of delicious teas, preserves, condiments, chocolates and biscuits, all in a reusable wicker basket. And of course, the book, Tea at Fortnum and Mason. To find out more about Fortnum and Mason and the delicious items that await you click *HERE*  Enjoy! - JW 


Friday 29 November 2013

BLT salad

This was my most sought after salad this week. The BLT salad. With a lovely homemade raspberry dressing, and tangy blue cheese. This salad was virtually inhaled at the dinner table. Sliced cherry tomatoes, wedges of green apple, rings of red onion, chunks of buttery avocado and shards of crisp bacon topped the baby romaine leaves. To make my raspberry dressing you will need...

1/4 cup raspberry wine vinegar
about a 1/2 cup of olive oil
1-2 spoonfuls of grainy mustard
about a tablespoon of honey or agave nectar 
some freshly ground pepper and some summer savoury 

I know some of my measurements are not exact. Salad dressing is fluid and therefore  seems relaxed when making a vinaigrette. One thing I am certain on is the amount of raspberry vinegar and olive oil. The other ingredients were just what I felt looked right. Adjusting the amounts to your liking and taste are easy with this recipe. 

Put all the ingredients as listed into a jar. Mix or stir all the ingredients together. You can do this by using a spoon and stiring carefully or by putting on the jar's lid, making sure the lid is on tightly, and shake vigorously. Trust me doing it this way lets you work some tension out. Once the ingredients have had a good stir or shake. The salad dressing is ready. Any unused portion can be stored in the refrigerator for a few days. 

Have a good weekend everyone! - JW  
  

Thursday 28 November 2013

Lavender, Popping Sugar and Vanilla

One of my most recent shopping trips had me stumbling upon these three lovely items. I absolutely luv finding items that make my experience in the kitchen fun, inventive and even more delicious.  


The prescriptive dark brown bottle intrigued me. The aroma of intense lavender waiting for me... and my baking. Add this to cookies, cakes and icing. 


Reminiscent of pop rockets. I can not wait to use this in some of my holiday baking. I will keep it as a surprise and let the popping commence joyfully!   


Whole vanilla beans are expensive. Finding ground vanilla beans at $9.99 for a 30g jar is fantastic. Not only is this gluten and GMO free the makers have a very enticing website, click on www.baktoflavors.com to see more. My first batch of shortbread got the honours and christened this respectably.

- JW 


Tuesday 26 November 2013

Chocolate & Zucchini ~ Daily Adventures in a Parisian Kitchen


I remember my mum baking chocolate zucchini loaf many times to my hesitation. What is it that brought those two ingredients together? Since then my culinary palette has broaden. The title is what caught my attention. Chocolate and zucchini coming together again however for possibly different reasons. The author, Clotilde Dusoulier is passionate about food and everything food related. Her luv of vegetables and chocolate was the inspiration for her award winning blog. Which then became the title for her book.

Even though the sub title suggests full on Parisian Cuisine she was fully inspired by her time spent in San Francisco. Her personality really comes across in the book. Her stories are delightful and inspiring and her knowledge is refreshing. The section called My Cooking Philosophy I could relate to especially the Organizing Your Cookbooks and Clippings paragraph. She shares more than 75 recipes. Starting with appetizers, main dishes, desserts, entertaining and dinner parties. All with a french flare and some with a wine pairing note. The photography is wonderful. Full page and in colour. This cookbook has a spot in my regular rotation of cookbooks.  

The recipe I would like to try from the book are: Mustard Chicken Stew, Chocolate Caramel Tart, Tomato Pistachio and Chorizo Loaf, Honey Spice Loaf, Cacao and Zucchini Absorption Pasta, Cumin Cheese Puffs, Broccoli and Apple Quiche and Onion and Cumin Quiche. 


I did make the Honey Spice Loaf, pictured here. The recipe was easy and it tasted so delicious! By the time my kidlets came home from school the loaf was cooling on the rack. The warm spices inviting them. Melting the snowy bits away.    

I like it just as is. However my husband likes to have a slice with a good slathering of butter. I could also see having some mascarpone cheese or sweet butter or apple butter spread a crossed the top.    

To read more about Clotilde Dusoulier and Chocolate & Zucchini click *HERE*  

Hope everyone and a good weekend. - JW 


Friday 22 November 2013

Leftovers #8 - Chicken Stew


I made all that stew now what to do! One can place it into containers and freeze it for a rainy or in our case snow day. Or you can simply dress it up with some ready made puff pastry. Honestly I can not take credit for this. Jamie Oliver has done this with his Steak and Guinness Pie. I am merely just following his lead. 


Place the stew in an oven proof dish. Take the ready made puff pastry and with a rolling pin roll it out, not too thin, to get a nice sheet of pastry. If you need to use more of the puff pastry then go ahead. How much you use will depend on the dish you use. 


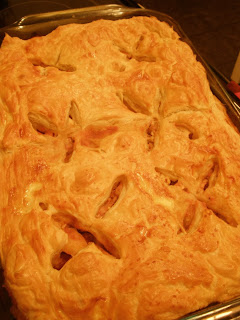
Once all the puff pastry has been rolled out place it on top of the stew, like the picture above. Tucking it here and there to create a nicely tight but loose edge. Think of a pie however puff pastry rises and puffs up into many delicate layers.   


Now score the top. I managed to do 6 criss cross markings. Take a pastry brush and brush the top of the puff pastry with an egg wash. As it bakes this will give the pastry a nice golden brown colour. Place in a preheated oven, 375ºF,  until golden brown and bubbling.

It would be interesting to try the puff pastry top with chill con carne. 

Have a good weekend everyone! - JW   

Tuesday 19 November 2013

My Weekend


Last week was such a busy week for me... for us actually. I got married this weekend and spent the week busily making shortbread for our champagne reception. I made 8 different varieties of shortbread. Chocolate chip, ground vanilla, cardamom and rosewater, plain with a diamond shaped jelly in the middle, chocolate and crushed chillies, spicy chai and lavender earl grey. All were consumed with great ease. Also guests received a delicious shortbread sampling to take with them. Unfortunately shortbread was the only thing I made. Olives, fruit, crackers and a cake of cheese set the table. 


This was our wedding cake. Completely made of cheese. The inspiration came from Marks and Spencer and Fortnum and Mason. Knowing that they could not deliver something like this we opted to create our own. Save On More was most accommodating in ordering and cutting the particular types of cheeses. Guests definitely had the pleasure of dismantling this cake.  


Finally us! It was a lovely day of bright sun and pure glistening snow. - JW  

Tuesday 12 November 2013

Chicken Vegetable Stew


Sometimes I can get a complete craving for a recipe. Plotting and deciding exactly how everything will come together. Stew is one of those mystical one pot wonders that comfort all especially when the temperature drop. It was absolutely divine to sit down with a bowl and the let the savoury herbs unfold in front of you. 

Chicken Stew
---------------------------------
3 chicken breasts, diced 
5-6 potatoes, cubed
2 parsnips, peeled and chopped
3 carrots, peeled and chopped
1 onion, peeled and chopped
1/2 cup red wine
2 x 796ml tins of diced tomatoes
3 bay leaves
1 teaspoon cumin
1 teaspoon rosemary
1 teaspoon thyme
1 teaspoon smoked paprika
salt and pepper to taste

* You can change the vegetables, add different seasonings, adjust the seasonings or herbs according to taste, and omit the wine and add beer. * 

First, place a bit of olive oil a the stock pot. Turn the burner on to medium heat. Add the chicken. Stir. Add a bit of salt and pepper. Continue sautéing the chicken. When the chicken has slightly browned add the onions. Stir and fry the onion for about 1 -2 minutes. Add the carrots, parsnips, and potatoes. Fry for a few minutes longer or until slightly tender. Add the cumin, rosemary, thyme and paprika. Pour the red wine in and add the tinned tomatoes. Stir everything around. Pop the bay leaves in. Bring to a boil and then let everything simmer for about 2 hours. Serve it with some naan bread or a slice of french baguette.

Enjoy! - JW 

Friday 8 November 2013

Crockpot Chicken Tikka Masala Pasta


Last nights dinner was easy to say the least. Chicken Tikka Masala with pasta made with the help of the slow cooker. A delicious spin on a classic and a great one for those who enjoy chicken and those who luv pasta. It was such a hit with the kidlets.

The recipe is from the Kitchen Magpie. For the recipe and to check out The Kitchen Magpie's lovely website click *HERE*

The only tweaking I did to this recipe was adding more chicken. About 3 cooked and diced chicken breasts and topped it with a bit of extra old cheddar cheese when serving. I really had to restrain myself because I wanted to add a dash or two of cumin. Other than the additional chicken and cheese I followed the recipe religiously. 


Have a good weekend everyone! 


Wednesday 6 November 2013

In Season


With the changing of seasons brings new or different culinary options. Depending on what produce is readily available at the market or shop. Going to different markets and shops may offer some variety. Snow has already settled on the ground in E-town so winter is definitely here. Depending on where you are it could be summer, it could be spring, it could be fall or winter. Also maybe the climate does not lend to a definite four season change. However in or out of season one might think one to be, with this cookbook one will always be kept in season.

In Season features 85 different produce organized by season. With 250 recipes displaying foods at their peak is the best way to enjoy and ensure their real flavour. Divided into 5 chapters; Spring, Early Summer, Late Summer, Fall and Winter. This book gives helpful tips on how to select, keep items fresh, preparing, how to use your selected fruit and veggies and preserving options. The "Did You Know?" facts offers you a bit of food for thought.

My favourite chapters are Fall and Winter. For me, that is when the oven genuinely starts working overtime, the slow cooker is on standby, and the kitchen constantly divulges all the baking goodness wafting throughout the house. The comforts of the season really  do come forward and the kitchen is the heart of the house. Since the winter has begun here, I will share the list of prime winter fruit and veg. 

Winter
-------------
Avocados
Bananas
Bean Sprouts
Ginger
Grapefruit
Kiwi
Lemons
Limes 
Mangoes
Oranges and Mandarins
Passionfruit
Pineapple 
Pomegranates
Sunchokes... 

Sunchokes? Look like ginger. Have a subtly sweet nutty flavour. I will have to keep an eye out for those.

Regardless of what season it is I thought this would be a good recipe to share from the book. Sounds fresh and lovely. Also I thought it would be good on toast topped with an egg.  

Tropical Salsa
-------------------------------------
1 cup diced mango (1 large mango)
1 cup diced papaya (1 large papaya)
1/3 cup diced kiwi (2 small kiwis)
1 cup diced pineapple
1/3 cup diced red bell pepper
1/4 diced red onion 
1/4 cup packed fresh cilantro leaves, minced
1 or 2 jalapeños, cored, seeded and minced
1 tablespoon fresh lime juice
pinch od salt
pinch of cayenne

Combined all the ingredients in a large bowl and toss gently. Taste and adjust the seasonings. 

Enjoy! -JW


Monday 4 November 2013

Parkin


Traditionally a Yorkshire recipe, Parkin is often eaten on Bonfire Night otherwise known as Guy Fawkes Night. November the 5th is highlighting the famous failure of Guy Fawkes, who tried to blow up the Houses of Parliament in 1605. This recipe was easy and I added a twist. Steaming hot custard poured over the gingerly cake. We won't be displaying any fireworks however we will have a sparkler or two to mark the day and this lovely Parkin.    


YORKSHIRE PARKIN
------------------------------------------

8 oz / 220g soft butter
4 oz / 110g soft, dark brown sugar
2 oz / 55g black treacle or molasses
7 oz / 200g golden syrup 
5 oz / 120g medium oatmeal
7 oz / 200g self raising flour
1 teaspoon baking powder
4 teaspoons ground ginger
2 teaspoons nutmeg
1 teaspoon mixed spice  
2 large eggs, beaten
2 tablespoons milk

Heat oven to 275ºF/ 140ºC/ gas mark 1

Grease an 8"x8" (20cmx20cm) square cake tin.

In a large saucepan melt the butter, sugar, treacle, golden syrup over a gentle low heat. Do not allow the mixture to boil. You just need to melt these together.

In a large, bowl stir together all the dry ingredients. Gradually add the melted butter mixture, stirring to coat all the dry ingredients. Mix thoroughly.

Gradually, beat in the eggs.

Finally add the milk and again stir well.

Pour the mixture into the prepared tin and cook for 1 1/2 hours until firm and set and a lovely dark golden brown.

Remove the Parkin from the oven and leave it to cool in the tin. Once cool store the Parkin in an airtight tin for a minimum of 3 days. That is if you can resist eating it. Leaving it up to a week is even better. Letting the flavour really develop and the mixture softens even further and the Parkin becomes more moist and sticky. Parkin will keep up to two weeks in an airtight container. 


* Eating the Parkin straight away is lovely. With all those warm spices it's so hard to resist. 

* Mixed spice is a British spice. It is a blend of the following ground spices: cinnamon, coriander seed, caraway, nutmeg, ginger, cloves, allspice and mace. Although is used in cooking and baking it is particularly used for Christmas cakes, Christmas Pudding and Hot Cross Buns.

* Some Parkin recipes have finely chopped candied peel. However I believe it is more traditional without. 

* Using parchment paper to line the bottom of the pan may help and make it easier to release the Parkin from the cake tin. 

Happy Bonfire... Guy Fawkes Night! - JW  


Friday 1 November 2013

Risotto with Saffron and Black Truffle Oil


Decadent as this sounds the flavour was subtle. However it made for a lovely side dish with fish. To make this risotto all you need are the following ingredients.

1 tablespoon olive oil
1 tablespoon black truffle oil
1 white onion, chopped
1 red pepper, chopped
4 tablespoons Vermouth or white wine
3 cups of low sodium chicken stock
A pinch of saffron
1 1/2 cups of aborio rice (Italian risotto rice) 
1/2 cup grated parmesan cheese

First pre-chop the the onion and red pepper. Set those aside. 

Heat the oils in the pan over medium heat.

Add the onion to the pan. Stir and until the onion becomes soft. 

Now it's time to add the rice...
Place the rice in and stir. Let the onion and rice cook together, stirring frequently. 
In the meantime warm up the chicken stock. You can pop it in the microwave for 2 minutes checking at the 1 minute mark to avoid splattering. Nobody likes extra mess in the kitchen then there needs to be. You can also warm up the chicken stock in a pot on the stove. When the stock is warmed add the saffron to it. Give it a stir and let stand for a few minutes. By warming up the chicken stock it is easier for the saffron to bleed out. Enhancing the stocks flavour and colour.   

When the rice becomes opaque and white, about 5-10 minutes. Add the Vermouth or white wine. Stir and let simmer until the liquid is absorbed.  

Add the red pepper and stir. 

Now add the chicken stock with the saffron to the pan. Stir and let simmer until all the liquid is absorbed. Stir frequently. If you need to add more liquid then do so by adding water or more chicken stock. When all the liquid is absorbed and the rice is firm but not too squidgy, remove from heat and add the parmesan cheese. Stir to coat. Serve immediately. 

The great thing about risotto is as long as you have the base ingredients rice, chicken stock, white wine and cheese you can essential add just about anything else you want to flavour this lovely dish. Try different veggies, oils, and spices. 

Have a good weekend everyone! - JW