Showing posts with label comfort food. Show all posts

Friday, 12 November 2021

Food Photo of the Day ~ Broccoli and Cheddar Cheese Quiche


Another classic and another comfort food classic at that... Broccoli and Cheddar Cheese Quiche. Whether it's breakfast, a light lunch, brunch perhaps or light dinner, quiche can be interrupted many ways with a variety of different satisfying ingredients.  Making it so easy to tuck into regardless of the temperature outside. 

- JD 

Friday, 24 September 2021

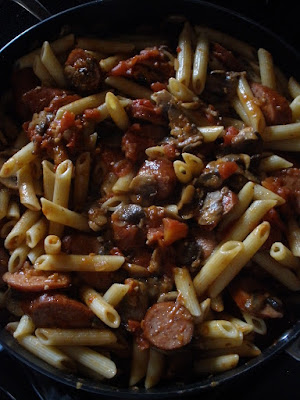
Food Photo of the Day ~ Sausage, Mushrooms and Tomatoes with Penne


There are plenty of comfort food recipes to reminisce and devour however sometimes the best recipes are done on a whim. Which is the case with this meal. Sautéing sliced garlic sausages, sliced mushrooms and a bit of purple onion with crushed garlic before adding a tin of low salt diced tomatoes and a good heaping dose of smoked paprika and Herbs de Provence. Toss in cooked penne pasta and you are ready to sit down and enjoy a handsomely rich, smoky herb meal in minutes. Inviting and substantial comfort food packed with flavour... Autumn has arrived!

- JD 

Friday, 27 August 2021

Lemon Linguine by Nigella Lawson


Not only is this recipe not complicated it is simple, and in a matter of minutes you will have a meal that it is absolutely delicious! Comfort food with a zesty lemon zing and when you are not ready to say goodbye to summer this is stellar and it! and when you need that bit of culinary uplift in the winter this is also it.  

Even though I have shared the recipe below, do have a glance at Nigella Lawson's website, nigella.com, to see what may tempt you. - JD 


Lemon Linguine - Nigella Lawson

----------------------------------------------------------------------------------------------------------

 Serves: 6

1 1/2 pounds linguine

salt and pepper

2 egg yolks

2/3 cup heavy cream

1/2 cup freshly grated Parmesan cheese (or vegetarian equivalent)

zest and juice of 1 lemon

2 tablespoons butter

TO SERVE:

fresh Italian parsley

small handful of basil leaves (optional)

METHOD:

1. Fill a very large pan with water for the pasta and bring to a boil. When it boils, salt abundantly.

2. Tip in the linguine, helping all of it submerge, then when it comes back to the boil, set a timer for two minutes less than the cooking time stated on the packet.

3. Get on with making the sauce. In a bowl, put the yolks, cream, grated Parmesan, zest of the whole lemon and juice of half, a pinch of salt and a good grating of pepper and beat with a fork. 

4. When the timer goes off check to see if the pasta is cooked or needs the full time.

5. Once ready, take out a mugful of the pasta water before you drain it, then once drained return to either the saucepan or a large warmed bowl.

6. Add the butter and toss it though, then add the sauce, tossing the pasta well, and adding a little of your reserved pasta-cooking water to help it emulsify and lightly coat the pasta. Have a taste to see if you want the juice from the remaining half lemon.

7. Sprinkle over some freshly chopped parsley (and a small handful of torn basil leaves, if wished) and serve immediately. 


Tuesday, 25 February 2020

Food Photo of the Day ~ Pancakes!


To me, pancakes are the ultimate comfort food; and can be dressed up in many ways. They may be sweet or savoury, depends on how you like them. Which ever way you enjoy them you can not deny their comfort food status.  

When I have plenty of things that need to be done; I find it refreshing to take the time and whip up a few pancakes to recharge and bring a sense of serenity. Plus, if there are leftovers and there always are, then they are devoured by my kids and my husband. Which is a welcoming bonus for them and me! 

There is plenty of sunshine out and about. Colder today as I muddle along... - JD       

Wednesday, 30 May 2018

Peach Cobbler

I must admit, that up until now I never made a peach cobbler. As first time peach cobblers go this was effortless and sweetly satisfying. I find cobblers are one of those comfort desserts that may be enjoy at any time of year; by simply changing the fruit.  


Peach Cobbler
--------------------------------------------------------------

3 cans of slices or halves peaches, drained
1 lemon, zested and juiced

1/2 cup unsalted butter, room temperature
3/4 cup white sugar

1 1/3 cups self raising flour
1 teaspoon British mixed spice
1/3 cup rolled oats
2/3 cup milk


Preheat oven to 375ºF (190ºC). Butter a deep 2 inch baking dish.

Place the drained peach slices or halves into the prepared baking dish. Sprinkle with the lemon juice and zest. 

In a large bowl stir together the butter and sugar. Mix for 4 to 5 minutes until creamy and resembles a sugary buttery paste. Add the oats, British mixed spice, and flour; stir into the buttery sugar mixture until the mixture resembles crumbly. Pour in the milk and stir , for approximately 3 to 4 minutes, until the mixture is moist and creamy, like a thick spreadable batter. 

Drop the batter by spoonfuls on top of the peaches. Spread the batter evenly over the surface over the peaches.

Bake in the preheated oven until browned and crisp, approximately 45 minutes. Let cool for at least 30 minutes before serving. 

Notes: You can make your own self raising flour by mixing together in a bowl...  1 1/3 cups unbleached all purpose flour, 2 teaspoons baking powder, and 1/2 teaspoon salt. 


With just a drizzle of berry syrup to add a summery touch. 


Hope everyone had a great weekend. After all the hot temperatures, some rain is coming our way. - JD 

Wednesday, 25 April 2018

Food Photo of the Day ~ Three Cheese Macaroni

When you are not quite ready to give up comfort food right yet; this gooey three cheese macaroni and cheese will pleasantly appease the last of those stodgy cravings. Cheddar, Monterey Jack, and Jalapeño cheeses are blended with elbow macaroni topped with a crispy parmesan panko crust.   


Hope everyone had a good weekend. Warm temperatures are here again!  - JD  

Tuesday, 20 February 2018

Risotto


Another item on my comfort food list is risotto. Perfect as a side or marvellous on it's own. This mushroom risotto with the addition of dry salami adds a pleasant smoky flavour. 

Mushroom Risotto with Mini Chipotle Dry Salami 
------------------------------------------------------------------------------

4 cups no salt vegetable stock, room temperature
1 tablespoon olive oil
3 tablespoons butter
1 small onion, finely chopped
1 pint of brown mushrooms, washed and sliced
1 1/2 cups risotto rice
1 cup dry white wine
1-2 mini chipotle dry salami sticks, sliced 
3/4 cup grated parmesan cheese
salt and pepper

Heat the olive oil with 2 tablespoons of butter in a deep large frypan over medium heat until the butter has melted. Stir in the onions and mushrooms and cook, stirring frequently, for about 5 minutes, until the onion and mushrooms are soft and nicely golden. Do not brown.

Reduce heat, add the rice into the fry pan, mix to coat. Cook stirring continuously, for 2 to 3 minutes or until the rice is translucent. Add the wine and cook, stirring continuously until the wine has reduced.

Gradually add in the room temperature stock, a cup at a time. Stirring continuously and add more liquid as the rice absorbs each addition. Increase the heat to medium so that the liquid simmers. Cook for 20 minutes, or until all the liquid is absorbed and the rice is creamy but still firm. Gently fold the sliced salami into the risotto's last 5 minutes of cooking time. 

Remove the risotto from the heat and add the remaining, 1 tablespoon of butter. Mix well,  then stir in the Parmesan cheese until it melts. Season with the salt and pepper, if you wish. Serve.

Notes: You may heat up the vegetable stock and add that to the risotto, instead of it being room temperature. Although it may pose some benefit however by the end of the recipe, I think, either room temperature stock or boiled stock create the same taste. So I go with less dishes and use room temperature stock.     
    

Hope everyone a nice long weekend. - JD 

Thursday, 19 October 2017

Leftovers #40 ~ Macaroni and Cheese with Ham and Mushrooms

Leftover mushrooms and slices of ham, not a problem. Just slice and cube, then gently sauté both in a frypan and add to the cheese sauce of your favourite homemade macaroni and cheese recipe. Fantastic comfort food. 

A few warmer days have been great; as I have been run down with a terrible cold. Hope everyone is having a good week so far. - JD 

Friday, 24 February 2017

Food Photo of the Day ~ Asparagus Quiche


Leftover steamed asparagus plus eggs equal... one satisfying dinner. Add chopped red peppers and plenty of feta cheese, all with a dash of hot sauce. This is an easy weekday meal that has flavour and comfort waiting to be shared.   


Have a great weekend everyone! - JD 

Friday, 23 September 2016

Malty Maple Cornbread


Just like scones, no two cornbread recipes are alike. I made this flavour of cornbread from the Beer cookbook. It had a sweet malty flavour and the texture was buttery, moist and yet crumbly. The only addition I made was placing grated cheese on top before the bread went into the oven to bake. When baked the cornbread had the perfect bubbly cheesy crust on top. You don't have to add cheese however cheese, porter, and maple syrup need I say more! 

Malty Maple Cornbread
------------------------------------------------------------------
makes 9 servings

1 cup coarse ground cornmeal
1 cup dark ale or porter
1/4 cup maple syrup
1 cup all purpose flour
1/2 teaspoon salt
1 tablespoon baking powder
2 large eggs
1/4 melted butter

1. Preheat oven to 400ºF. Grease 9x9-inch pan. Combine cornmeal, porter and maple syrup in a small bowl.

2. Sift flour, salt and baking powder into a large bowl. Add cornmeal mixture, eggs and melted butter. Stir until well blended.

3. Pour batter into prepared pan. Bake 20 to 25 minutes or until wooden pick inserted into centre comes out clean. Cool 10 minutes. Cut into squares. 

Notes: I slightly greased the pan and then lined the pan with baking parchment. I used porter not a dark ale so the flavour was a bit more robust. Second slices were had however there were leftovers and after a few days the flavour did not mellow it seemed to intensify. 


The sun has retreated today. Overcast skies and a chill is in the air. Winter will soon be here. Have a great weekend everyone! - JD  

Friday, 21 November 2014

Leftovers #15 ~ Rice Pudding


As far as comfort food desserts go, rice pudding hits the top of the list. This recipe is quick, easy and delicious. All you need is some leftover/day old rice, milk, sugar, an egg, salt and a few other ingredients to create such enveloping comfort in a bowl.  

Creamy Rice Pudding
----------------------------------
1 1/2 cups leftover or day old rice (rice that has already been cooked)  
2 cups of milk
1/4 teaspoon salt
1 egg, beaten
2/3 cup raisins - optional  
1/3 cup caster sugar
1 tablespoon butter
1/2 teaspoon vanilla extract 

Combine cooked rice, 1 1/2 cups milk, and salt in a large sauce pan over medium heat. Cook and stir until thick and creamy... for about 15 - 20 minutes.

Stir in the remaining 1/2 cup milk, beaten egg, sugar, and raisins (if adding any) into the rice mixture and stirring continually. Continue cooking until egg is set for about 2-3 minutes. 

Remove from heat. Stir in the butter and vanilla extract into the pudding.

Serve.

Notes: 
As you know I always have some leftover rice on hand... however if you do not have any leftover/day old rice then cook some rice, according to package, and use that. I was having a terrible time opening the bottle of vanilla extract therefore I used rosewater essence instead. I also added ground vanilla bean to the sugar and served it with edible rose petals. Ground pistachios would be a nice touch as well.   

Have a good weekend everyone! - JW 

Monday, 20 October 2014

Leftovers #14 ~ Turkey Poutine

With all the hot turkey opens, turkey sandwiches, and turkey curry soup I made turkey poutine. Fairly simple and a great way to use up the last staggering bits of turkey.

I took ready made chips, french fries, and cooked them according to the package. I baked them for a few extra minutes so that the chips became crispy. When cooked I removed the chips from the baking sheet by placing them on a plate. I then covered the baking sheet with parchment paper, being careful because it is hot. The chips were placed back onto the baking sheet and were dressed with the leftover turkey, then gravy, and finally cheese. The chips were placed back into the oven until the cheese was nicely melted. Remove the turkey poutine from the oven and serve immediately.  

You can always make your own chips however if you want to save time use ready made, low sodium, low fat chips like I did. Do not have cheese curds then use whatever cheese you may have on hand. This is one dish where you can be as creative as you like. Adding different toppings and dressing the chips how you like.   
  
Hope everyone had a good weekend, we did! - JW  

Sunday, 31 August 2014

My Vegetable Lentil Vindaloo

Who doesn't luv a good curry. And who doesn't like a catchy English football song. This vegetable lentil vindaloo is easy and will have you singing. With a few basic ingredients creating something spicy and comforting is just minutes away.  

Vegetable Lentil Vindaloo
-----------------------------------------
2 tablespoons coconut oil
1 onion, diced
1 clove garlic, crushed
1 package of 284 gram (10 oz) pre cut veggies (mixture of cauliflower, broccoli and carrot)
grated rind of 1 lemon 
1  796ml (28oz) tin of low sodium diced tomatoes 
1 540ml (15 fl oz) tin of low sodium lentils
1/4 cup of Patak's Vindaloo paste

1. Place the coconut oil in a large pan on medium to high heat. Once melted, add the onions and garlic. Sauté until the onions are semi soft... just about clear.

2. Then add the veggies and sauté for a bit longer. Once the veggies have changed colour and are still a bit firm add the grated lemon rind. Stir.

3. Add the tin of tomatoes. Stir to combine.

4. Add the vindaloo paste. Stir until combine.

5. Let simmer for a few minutes. Once it is bubbling about in the pan, add the lentils. Let simmer for about 5 minutes.

Remove from heat and serve with rice or naan bread.  

Notes: You may add the juice from the lemon however that will make the vindaloo quite tangy. So it depends on your tastes. You may also substitute the lemon rind or lime rind.  Tin tomatoes and tin lentils help however using fresh tomatoes and dried lentils may be more to ones liking. Adding a dollop of yoghurt on top according to individual taste is nice however once the vindaloo is done and removed from heat you may stir in 1 cup of yoghurt. I was going a bit light with the Vindaloo paste because not everyone likes it spicy. Adding 1/2 cup of Vindaloo paste will change the intensity greatly, again personal preference. There are probably other ingredients you may add like fresh cilantro and honey to ease some of the heat. What is great about this, is that as long as you have the basics you may play around with ingredients according to spiciness. 

It basically took about 30 minutes to make which is great for a weekday meal. Having pre cut veggies saves time. 

Hope everyone is enjoying their long weekend. - JW    

Thursday, 25 April 2013

Savoury Bread Pudding


This week I made savoury bread pudding. I made a huge pan so there would be plenty of leftovers. Although I see bread pudding as being a dish one would snuggle up to during the coldest months of the year, I can also see this fluffy seasoned dish making an appearance or two during the warmer months as well. 

To make this Savoury Bread Pudding you will need the following:

1 red onion, diced
approximately 10 mushrooms, sliced
small pint of cherry tomatoes, cut in half
a bunch of spinach or kale or swiss chard, chopped

olive oil
balsamic vinegar or red wine vinegar
thyme
tarragon
rosemary
summer savoury
smoky paprika

1 loaf of day old bread

8 eggs
2 cups of milk
salt and pepper  

Preheat the oven to 375ºF. 

Prepare all the vegetables. In a pan add some olive oil. Turn the element on to medium high heat. Once the oil has warmed up, add the onion. Stir. When the onion has soften a bit, add the mushrooms. Stir. Add the tomatoes. Stir again and let those vegetables simmer for a bit. When the mushrooms and tomatoes have soften a bit add the greens of your choice. Now the pan may look like it's going to overflow. Do not worry everything will simmer down. You made need to add some more olive oil and at this time you can add the balsamic vinegar or red wine vinegar. Stir to make sure everything is not sticking and gets coated with the oil and vinegar. Now it's time to add the herbs and seasoning. I didn't give exact measurements on the herbs and seasonings because you can adjust those to your liking. Once everything has simmered and looks like this...

  
I must say at this point the aroma was very inviting. Everything in the pan had come together nicely. Remove from heat and now it's time to prepare the bread. The day old loaf you use doesn't have to be pre sliced. Since mine was, I cut each slice in half making two triangle pieces. Once all the slices have been cut, butter the bottom of the baking dish. 
Arrange half the bread slices on the bottom of the pan. Take some of those lovely simmered down veggies and spread over the slices of bread. Then placing the remaining slices of bread on top of that and using the remaining veggie mixture on top. Now there is no rhyme or reason to placing the bread. Just place them as you see fit. Trust me when  all is said and done nobody is going to notice how the slices of bread were or weren't arranged. That is the pure charm of this dish. 
Break the eggs in a large bowl and add the milk, salt and pepper. Mix together. Then pour over top of the bread layered with the veggie mixture. Making sure everything gets coated. Pop in a preheated, 375ºF oven for about 40 minutes or until everything is puffy, golden and the eggs have set. Serve immediately with grated cheese on top. 

You can always change the order of the prep work by slicing the bread first, buttering the pan then chopping the veggies and continuing from there. Bread pudding whether sweet or savoury is such a labour of delightful comfort. - JW  


Thursday, 29 November 2012

Pasta! Pasta!

A couple of weeks ago the University was having a book sale. I went to browse and see if anything caught my eye. Many of the boxes clearly were full of academic books. Still I browsed some more and found two cookery books and a few poetry books. Aside from the popular pasta dishes this cookbook caught my eye purely on the illustrations. 


Pasta! Pasta! is only 64 pages however to me pasta is one of the quintessential comfort foods. With an Introduction and How to Please Your Pasta (a basic guide to the do's and don'ts of pasta cooking). You will be singing That's Amore in no time. The section on the Cooking of Pasta should be most helpful. Nobody likes over cooked mushy pasta! Cheeses for Pasta... well there are only three mozzarella, parmesan and ricotta. 

Some of the most popular pasta recipes are featured in this book. You have Fettucce Alfredo, Ravioli, Linguine alla Marinara, Manicotti, Vermicelli e Pollo, Penne alla Carbonara and let's not forget Spaghetti Bolognese. The last page features six classic sauces. I will share the most simplest of them all Marinara Sauce. It can virtually be served over any pasta you wish and can also be used as a pizza sauce.

Marinara Sauce - 3 tablespoons oil, 1 large onion chopped, 1 small carrot chopped, 1-2 cloves garlic crushed, one 2 - pound can of tomatoes or 2 pounds fresh tomatoes, peeled and chopped, 1 teaspoon dried oregano, 1/2 teaspoon dried basil and salt and pepper to taste.
   
Sauté in oil the onion, carrot and garlic for about 5 minutes. Add the tomatoes, breaking them up with a wooden spoon. Add the oregano and basil and simmer, partially covered for about 30 minutes. Strain the sauce through a fine sieve, pushing down hard on the vegetables. Reheat if necessary. If the sauce is too thin, boil it down, uncovered over medium heat until it has reduced to the desired consistency. Season with a salt and pepper to taste. 


Here is a photo of the illustrations that accompany the recipes through this cookbook. They just scream 1970's! Not to confuse you the steps are numbered and the illustrations are there as a quick visual reference. Buon Appetito! - JW   

Thursday, 26 April 2012

Wednesday Roast


Growing up roasts were always on Sunday. Hence the term Sunday Roast. Well last night I brought Sunday Roast to Wednesday night's dinner. It has been awhile since I roasted beef. With much research and crossing referencing multiple recipes all I know is that I wanted it done and slow roasted. Nobody likes it when the main coarse is overdone and tough! The roast was drizzled with olive oil and then very generously smothered with Herbes de Provence. I let the beef marinate with this mixture for about six hours in the refrigerator. Usually Herbes de Provence consists of the following mixed herbs savory, fennel, basil, thyme and lavender. The mixture that I have included garlic and lemon peel. The house smelt wonderful, very fragrant! I roasted the beef at 325º for 2 hours, uncovered with a bit of water in the bottom of the pan. It probably could have used an extra 15 minutes. As I said I wanted it done but not tough.   


In a large foil tray I tossed pre-boiled potatoes and carrots and tossed them in olive oil, salt and pepper. I also added five whole cloves of garlic into the mix. Normal I would add some herbs and balsamic vinegar but omitted them this time. Due to the fact that the beef was encrusted with Herbes de Provence and I was also serving the meal with a curry gravy. Talk about worlds colliding but all the flavours worked so well together. I roasted the potatoes and carrots at 400º for about 30-40 minutes. Occasionally tossing... chuffing them in the foil tray.    


After all the effort this is how it was served pre-gravy. Also added was a side of peas because it just wouldn't feel complete otherwise. - JW


Friday, 17 February 2012

Cornbread


For some reason over the past week I have made three pans of cornbread. I can't really explain this one other than the fact that it is very tasty! I have used more of a finer cornmeal in the past. Almost like a corn flour you would say. But I have found a more coarser cornmeal which gives more of a crunchy texture. I group cornbread with scones, it's one of those ever present versatile pieces complimenting whatever dish it is paired with. Whether it be lunch, dinner or breakfast, cornbread adds comfort to any plate.

Here I mixed 1 cup of cornmeal with one cup of flour, white or whole wheat you decide. A pinch of salt. About 4 tablespoons baking powder. About 1 to 2 tablespoons of sugar... I prefer to use brown sugar. If you are watching your sugar intake then reduce the sugar or skip it altogether. Then add these next three ingredients to the dry ingredients you have just measured out. Sometimes I am a one bowl kind of girl. Using every possible or separate dish or bowl means only one thing, I have to wash them all. Who wants to spend a lot of time washing when there are other things to do! Make a well in the middle of the bowl. 

Add one egg, about a cup of milk and about 1/4 cup of soft butter or margarine. Mix until all is smooth and combined. No overbeating. Pour into a greased pan. I used a square 8 inch pan that was greased and lined with parchment paper. Bake in a preheated 425º oven for approximately 25 minutes, checking half way. As always it's best to serve warm! 

Have fun and add this to whatever dish you are making this weekend. Enjoy! - jw

Monday, 16 January 2012

My Afternoon Warm Up!


While I was out braving the minus 27 degree weather, the thing I kept thinking about was a grilled cheese sandwich. As soon as I got home and put the shopping away I smacked together two pieces of rye bread, cheddar cheese and salami. Very satisfying. This was more than Dylan Moran's melted imaginary cheese thing... it was real and warm! - jw


© copyright photos by Jacqueline Williams.

Thursday, 12 January 2012

comfort food


Last night I made macaroni and cheese to much of my six year olds dismay. The past two days have been cold and I have been craving some solid comfort food. Macaroni and cheese was it! Of coarse the recipe was simple... it's macaroni and cheese. When it says 2 cups of cheese I take that as an invitation to add more cheese. I served this dish with a mixed green salad. Simple delicious comfort food.


bubbly and very cheesy... 2 cups of uncooked elbow macaroni, 1/4 cup butter, 1/4 flour, 1/2 teaspoon of salt, 1/4 teaspoon pepper, 1/4 teaspoon ground mustard... I used prepared Dijon mustard instead. 1/4 teaspoon Worcestershire sauce, 2 cups of milk... I used Skim milk. 2 cups shredded sharp Cheddar cheese.

Heat oven to 350 degrees. Cook macaroni according to package. While the macaroni is cooking... Melt butter in a sauce pan. Stir in flour, salt, pepper, mustard and Worcestershire sauce. Cook over low heat, stirring constantly, until mixture is smooth and bubbly; remove from heat. Stir in milk. This is where I used a whisk instead of a wooden spoon. Heat to boiling, stirring constantly. boil and stir for 1 minute, remove from heat. Stir in cheese until melted. Drain macaroni. Gently stir macaroni into cheese sauce. Pour into ungreased 2 quart casserole dish. Bake uncovered 20 - 25 minutes or until bubbly.


© photos by Jacqueline Williams