Showing posts with label easy. Show all posts

Friday, 10 December 2021

Food Photo of the Day ~ Tofu Stir-fry Bowl


Dinner may be as simple or complex as you like and at times it doesn't have to be pretty, just delicious. I do enjoy in creating quick pulled together nutritious meals and this tofu stir-fry is just that. Panfrying the tofu and then sautéing it in a sticky sauce, add some grated carrots and sautéed kale in sesame oil with a dash of rice vinegar, topped with a hard boiled egg and served in a bowl with with rice that's sprinkled with chopped green onions and dried shredded coconut. Delicious!    

Tuesday, 5 May 2020

Easy Dinner Rolls


I can not stress how easy these dinner rolls are to make. With not much labouring and a pat of butter; you will have scrumptious melt in your mouth rolls that you will want to repetitively make and serve over and over again.  

Easy Dinner Rolls
-----------------------------------------------------------------

2 cups unbleached all purpose flour
2 teaspoons baking powder
1 teaspoon salt
1 cup milk
4 tablespoons mayonnaise

Preheat oven to 350ºF. Line a baking tray with baking parchment paper and set aside.

In a large bowl combine all ingredients together. Once a soft dough is formed; turn out onto a clean floured surface. Lightly knead and flatten gently with hands, using a 2 1/2 inch circular cookie cutter. Collect the remaining dough bits and form together again and continue cutting circular shapes until all dough is used up. Brush the tops of buns with olive oil.  

Bake for 20 to 30 minutes or until lightly golden.

Notes: if you find the dinner rolls are not browned to your liking, place under the broil for a few minutes but do keep an eye on them as you do not want them to get burnt. Also you may try to free form the dinner rolls rather than using a formed cutter.   


Wednesday, 1 April 2020

Food Photo of the Day ~ Pan-fried Potatoes with Shredded Carrots

The potato has been one of the most modest side dishes, as well as being a staple. Pan-fried potatoes can easily be made into a side dish or a main. Adding shredded onions, carrots and or cabbage is a nice way to add a bit of flavour. You can do this with regular sized potatoes although you will have to cut them in half before boiling and cut them again when cooled. My mum would always do pan-fried potatoes, whether they were boiled or mashed, with leftovers potatoes. It was a great way to use up those leftovers and create a side dish for a meal.     

Boil the mini potatoes, in a large pot with water, until just tender. Drain and allow to cool enough to cut each mini potato in half. Heat a little oil or butter in a fry pan over medium high heat. Add the cut potatoes and sauté for a few moments. Add fresh or dried herbs, salt and pepper. Then add whatever shredded vegetables you wish. Sauté for a few more minutes, until potatoes are nicely golden brown and the shredded vegetables are semi-soft. Serve. 

Hope everyone had a good weekend and is keeping well. - JD 

Friday, 20 March 2020

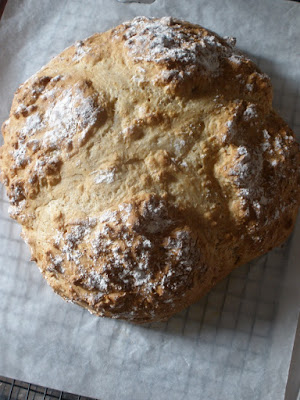
Soda Bread


Soda Bread may be enjoyed anytime not only on St.Patrick's Day, well at least I think so. I stumbled across this Paul Hollywood recipe and my only modification was that I added two tablespoons of honey. A touch of sweetness to a lovely foolproof recipe.  

Soda Bread - Paul Hollywood
--------------------------------------------------------------------------

250g/9oz plain wholemeal flour
250g/9oz plain white flour
1 teaspoon bicarbonate of soda (baking soda)
1teaspoon salt
420ml/15 fl. oz buttermilk
2 tablespoons honey, optional
extra flour for dusting

Preheat oven to 200ºC / 400ºF /Gas 6

In a large bowl, mix together the two types of flour, bicarbonate of soda, and salt.

Add the buttermilk and, honey if adding any, mix until a sticky dough forms.

Lightly flour a work surface and tip the dough onto it.

Gently roll and fold the dough a couple of times to bring the mixture together. DO NOT KNEAD 

Shape the dough into a ball. Flatten the ball gently with your hand. Score the dough with a deep cross dividing it into quarters. Dust the bread with flour.

Place onto a baking tray lined with baking parchment and bake for 30 minutes at 200ºC/400ºF/Gas 6. The loaf should be golden brown. Leave to cool on a wire rack. This is best eaten on the day of baking.

Tuesday, 3 September 2019

Oven Baked Tortellini


Still riding on the baked pasta theme I thought I would try baked tortellini. I opted for a less creamy sauce by not adding any type of cheese to it therefore making a more tangy tomato sauce. Another tasty meal in minutes!    

Oven Baked Tortellini
----------------------------------------------------------

2x 350g packages cheese tortellini
3 cups tomato sauce, homemade or from a jar
1 tablespoon thyme
1 teaspoon oregano
frozen spinach, defrosted and any excess liquid squeezed out
parmesan cheese
mozzarella cheese

Preheat the oven to 350ºF. Lightly grease a 9x13 baking dish. Set aside.

Cook the tortellini according to package directions. Drain well.

In a large bowl stir to combine the tomato sauce, herbs and spinach.  Add the drained cooked tortellini to the sauce mix and gently stir. Add the now sauced tortellini into the prepared baking dish. Top with shredded parmesan cheese then some shredded mozzarella cheese. Place into the preheated oven and bake for 20 minutes or until the cheese has melted and bubbly. Allow to set for 5 minutes before serving.   


Hope everyone had a good weekend! It's back to school so I am expecting a bit of a flurry over the next couple of weeks. - JD 

Wednesday, 6 March 2019

Granola Cookies

These no fuss cookies are crisp, chewy and buttery. An understated deliciousness that is quite satisfying.   


Granola Cookies
-----------------------------------------------------------------

1/2 cup unsalted butter, softened
1/3 cup caster sugar
1/3 cup dark brown sugar, packed
1 teaspoon maple extract
1 large egg
2 cups granola, any flavour, slightly crushed
1 cup unbleached all purpose flour
1/2 teaspoon baking soda
1/4 teaspoon baking powder
1/4 teaspoon salt

Preheat oven to 350ºF. Line a baking tray with baking parchment paper. 

In a large bowl, beat the butter, sugars, maple extract and large egg with an electric mixer on medium speed, or you can mix with a wooden spoon, until blended and creamy.

Stir and mix in the granola and the dry ingredients.

Using your hands, roll the dough into balls, no larger than a walnut, place on the prepared baking tray and gently press the tops. 

Bake 9 to 11 minutes or until lightly golden brown and the edges and centre are set but not hard. Allow to cool for 1 minute then remove the cookies to a wire rack. 


Hope everyone had a lovely weekend. - JD 

Thursday, 19 July 2018

Delicious on a Dime


At first glance of this cookbook with it's title one might think it was printed awhile ago. After reading the page of acknowledgements, the book was done not so long ago, 2012. The premise is to use non-pricey ingredients to create cost effective or cost cutting delicious recipes. Saving you time and money while eating well.

With 154 recipes, there is something for everyone. Each recipe has a point breakdown into Prep, Bake/Cook Time, Yield/Serves, and a Cost per Serving. There are helpful Kitchen Tips for boosting flavour, substituting an ingredient, storing, adding more veggies, making it healthier, adding more spice, omitting nuts, and saving time. All in all this cookbook is quite handy. 

There are plenty of recipes to ponder over like Chicken Tamale Casserole, Baked Pasta with Peas and Ham, Potato, Pepper and Chorizo Hash with Fried Eggs, Green Salad with Roasted Beets, Goats Cheese and Almonds, Salmon, Potato Green Bean Salad, "Fried" Ice Cream Truffles, and Mocha Truffle Cake. I am going to share this interesting recipe from the cookbook...

Pretzel-Crusted Chicken Nuggets
------------------------------------------------------------------------------------------
Prep: 15 mins  Bake: 25 min  Serves:4  Cost per Serving: $1.79

•2 cups salted pretzel twists (about 3 oz)
•1/2 cup grated Parmesan cheese
•1/2 cup all-purpose flour
•1/4 teaspoon pepper
•2 large eggs
•1 Ibs. boneless skinless chicken breasts, cut into 2-inch pieces


1. Preheat oven to 400ºF and coat a large baking sheet with cooking spray. Place pretzels and Parmesan in a food processor and process until coarsely ground and well mixed, 20 to 30 seconds. Transfer to a large bowl.

2. Combine flour and pepper in a separate bowl. Beat eggs with 1 teaspoon water in a third bowl. 

3. Roll a chicken piece in flour mixture until throughly coated. Dip in eggs, allowing excess to drip off. Transfer to pretzel mixture and turn until throughly coated. Place chicken on baking sheet. Repeat with remaining pieces of chicken. Bake until lightly browned, 20 to 25 minutes.

Kitchen Tips: 

*Switch cuts. Make this recipe with boneless chicken thighs. Bake for about 10 minutes longer. 

*Get Saucy. Serve the nuggets with ponzu, a Japanese dipping sauce made of lemon juice, soy sauce, sugar, vinegar and grated fresh ginger. Or offer a honey-mustard or barbecue option if you prefer.  


It's been hot and humid here; doing what we can to stay hydrated and cool. - JD   

Thursday, 28 June 2018

Food Photo of the Day ~ Cheesy Pasta Bake

When you don't have the noodles to make a lasagne however have an abundance of other pasta noodles, creating this lasagne inspired pasta bake is easy. Make your favourite tomato sauce with vegetables and or meat. Soy veggie ground may be used as well. Cook pasta according to directions. Mix cooked pasta and sauce together. Grate mozzarella cheese or your favourite combination of cheese. Place half the pasta mixture evenly into a large baking dish. Sprinkle with grated cheese. Spoon the rest of the pasta mixture on top and sprinkle with more cheese. Bake in a preheated 350ºF oven until cheese is melted and bubbly, approximately 10 to 20 minutes. Remove from oven. Allow to settle and cool slightly before serving. 


Hope everyone is having a great week. With school finishing up, things have been quite hectic; so my time is being stretched. - JD      

Tuesday, 14 November 2017

Chickpea Chocolate Chip Cookies

I have posted a chocolate chip cookie recipe before using chickpea flour however this recipe is slightly different than that one. This recipe uses chickpeas and the cookies are more soft and chewy in texture. With the help of a blender you will have these delicious cookies whipped up in no time.   


Chocolate Chip Cookie 
---------------------------------------------------------

1 can (15oz) chickpeas, drained
1/3 cup peanut butter
1/2 cup oat flour
1 teaspoon baking powder
1/4 cup maple syrup
1/2 teaspoon vanilla extract
2 tablespoons milk or soy milk
1 cup mini chocolate chips or 1/2 cup regular chocolate chips


Preheat oven to 350ºF. Line a baking tray with baking parchment paper and set aside.

Place the drained chickpeas, peanut butter, oat flour, baking powder, maple syrup, vanilla extract, and milk into a blender and blend until a smooth dough has formed.  

Place the dough into a medium bowl and stir in the chocolate chips. Once the chocolate chips have been mix into the dough. Use a dessert spoon to drop the dough on to the prepared baking tray. Use a knife to help lift the dough off the spoon as it may be quite sticky and tacky. Gently press down with the back of the spoon, or another spoon if you wish but why create more dishes to wash. Repeat until all the dough has been used. 

Bake in the preheated oven for 12 to 15 minutes or until nicely browned on the bottom. Remove the tray from the oven and gently press the tops of the cookies down with the underside of a lifter/spatula or fork. Let rest on the cookie sheet for 2 minutes then transfer to wire racks to continue cooling. Repeat until all the dough has been used. 


Notes: I made about 22 cookies.


Hope everyone had a good weekend! - JD   

Friday, 24 February 2017

Food Photo of the Day ~ Asparagus Quiche


Leftover steamed asparagus plus eggs equal... one satisfying dinner. Add chopped red peppers and plenty of feta cheese, all with a dash of hot sauce. This is an easy weekday meal that has flavour and comfort waiting to be shared.   


Have a great weekend everyone! - JD 

Wednesday, 1 February 2017

Roasted Cauliflower Salad


January has come and gone and lightening the culinary cuisine was in order. This substantial salad is great on it's own or as a side. It also got an honourable mention in E-town's weekly newspaper, the gastro section. 

Roasted Cauliflower Salad
------------------------------------------------

1 medium sized cauliflower, outer leaves removed, and chopped
5- 7 dried dates, chopped
1/4 cup unsalted sunflower seeds
handful of arugula 


First in an oven proof dish, that has been lightly oiled, add the pieces of cauliflower. Place in a preheated 400ºF oven and roast for about 30 minutes. Checking every 10 minutes, and drizzling with a bit of water. When done. Remove from oven and allow to cool.

Once the cauliflower has cooled, in a large bowl combined the cauliflower and arugula. Drizzle what ever salad dressing you wish, I made a simple oil, balsamic vinegar, and herbed dressing. Toss to coat. Sprinkle the chopped dates and the sunflower seeds on top. Serve.     


The honourable mention as mentioned. 


Wednesday, 25 January 2017

Drop Bannock


Scottish poet Robert Burns proclaimed "Oatcakes are a delicate relish, When eaten warm with ale." They are also quite lovely when eaten with whisky too. However if you have neither; then bannock are quite satisfying with a bit of butter and a spot of jam. This recipe, predominately made with oatmeal, therefore I did have some trepidation, due to making bannock with flour previously, turned out wonderfully. Simplistic and more pancake like however undeniable delectable and moreish.

Drop Bannock
-----------------------------------------------

1 egg 
1 pint of milk
1/2 teaspoon baking soda
1/4 teaspoon salt
oatmeal as required

Beat the egg. Stir in milk. Stir in soda, salt, and enough oatmeal to make a droppable batter. Pour into a jug. Rub a frying pan with some butter. Warm the pan over medium high heat. Pour the batter into small rounds; You may also drop the batter from a serving spoon, if you wish. Heat until bubbles form on top or the bottom is nicely brown, then turn and brown the other side; as you would with pancakes. 

Notes: I added 1/2 teaspoon of British mixed spice, for a bit of flavour. 
  

Wednesday, 30 November 2016

Buttermilk Bread


Making bread can acquire all the right elements. This recipe is pretty straightforward and doesn't require a lot of attention. Dense with a melt in your mouth lightness. This loaf is scrumptious served at any meal and is particularly lovely at breakfast with a cup of tea and a slathering of jam.

Buttermilk Bread
--------------------------------------------------
Makes 1 loaf

2 cups flour
2 tablespoons sugar
1 teaspoon baking soda
1 teaspoon cream of tartar
a pinch of salt
2 tablespoons butter
cup buttermilk or sour milk

Preheat oven to 350ºF.

Butter and flour a loaf pan. You may also line with a piece of baking parchment paper. 

In a large bowl blend the flour, sugar, salt, baking soda, and cream of tartar together with a whisk.

Add the butter and mix throughly with your hands for approximately 3 to 4 minutes until the flour mixture and butter together become a crumbly mixture. Add the buttermilk and form a soft dough. Place into the prepared loaf pan and bake for 45 minutes.  

Notes: If you do not have buttermilk or sour milk, add a teaspoon of lemon juice to a cup of whole milk.  


Hope everyone is having a good week so far. Temperatures are dropping... stay warm! 
- JD 

Wednesday, 23 November 2016

Cornflake Squares


Keeping it simple... and quite frankly what to do with a large box of cornflakes that everyone has grown tired of. I think I prefer these over rice krispie treats. They have almonds, coconut, dried fruit, and cereal all mashed about in marshmallowy gooeyness with a touch of chocolate on top.    


Cornflake Squares
------------------------------------------------------

1/2 cup of butter
1 package (400g) of mini marshmallows
1 cup sliced almonds
1 cup flaked coconut
1/2 cup dried cranberries, chopped
4 cups cornflake cereal

good quality chocolate, melted for drizzling over the top

9x13 inch pan buttered and lined with baking parchment paper.

Place the butter into a large saucepan and gently melt over medium heat. Stirring occasionally, add the marshmallows; allowing to melt and combine with the butter. Add the sliced almonds, flaked coconut and chopped cranberries, stirring to combine then add the cornflakes, stirring once again until nicely coated. Press into the prepared 9x13 inch pan and allow to set for about 1/2 an hour. 

When set, melt the dark chocolate and drizzle over the top. Allowing the chocolate to cool and set then cut into squares. 

Notes: You can toast the sliced almonds and coconut if you like. 

Hope everyone is having a great week. A bit on the chilly side here. - JD 

Friday, 18 November 2016

Stewed Apple Pudding


Here is a quick winter warmer that has all the comfort and familiarity needed in one dessert. Delicious sweet apples nestled in pudding.  


Stewed Apple Pudding
--------------------------------------------
Serves 8

6-8 apples, peeled, cored, and sliced
4 oz. caster sugar
2 oz butter
2 tablespoons water
1 egg
1/2 cup flour
1/2 teaspoon baking soda
pinch of salt
2 tablespoons of milk
grated rind of 1 lemon


Preheat oven to 350ºF.

Cook the apple slices in water until just soft.

Place in a buttered oven proof pie dish and sprinkle with a bit of sugar.

Cream the butter and sugar together and add the beaten egg.

Then combine the flour and milk with the baking soda and lemon rind. Mix well and spread over the slices of apples. Sprinkle with cinnamon and bake for 20 minutes or until golden. Serve. 

Notes: I stewed the apple in Earl Grey tea which gave them a bit more flavour. It is as simple as adding 2 tea bags to the water that stews the apples.


Have a great weekend everyone! - JD  

Friday, 11 November 2016

Roasted Vegetable Penne


Looking for a quick mid-week... weekend meal this roasted vegetable penne has everything plus a few minutes to spare. Oven roasted vegetables are well paired with this cheesy, garlic pasta and will quickly gather family and friends around the dinner table.   


Roasted Vegetable Penne 
--------------------------------------------------------------
Serves 6 

500g penne
4 peppers, any combination of red, yellow and orange
2 zucchini
1 pint of brown mushrooms, thickly sliced
2 shallots, diced
1 tablespoon of vegetable oil
1 tablespoon of balsamic vinegar
1 tablespoon mixed herb seasoning mix

1/4 cup olive oil
1/4 cup of reserved pasta water (water from the cooked pasta)
2 cloves of garlic, crushed
1/2 cup grated Asiago cheese 


Preheat oven to 400ºF and line the baking tray with a piece of baking parchment paper.

Place the prepared peppers, zucchini, mushrooms and shallots into a large bowl. Toss with the 1 tablespoon of vegetable oil, balsamic vinegar, and mixed herb seasoning mix. Once nicely coated place on the prepared baking tray and roast in the oven until tender and brown... about 20 to 25 minutes.

In a large pot cook penne according to package. Before draining reserve 1/4 cup of the pasta water.

Place the drained pasta back into the pot over no heat. Stir in the reserved water, the 1/4 cup of olive oil, and the crushed garlic while the pasta is hot. That way it will cook the garlic a bit. Stir in the roasted vegetables and cheese. Sprinkle with a bit more cheese. Serve.


Have a good weekend everyone! - JD 

Friday, 4 November 2016

Easy Oven Beef and Vegetable Stew


There is something refreshing about placing a mountain of ingredients into one pan, placing it into a roaring oven and letting it stew for a few hours. The results are a delicious and hearty meal

Easy Oven Beef and Vegetable Stew
--------------------------------------------------------------------------
Serves 6

1 1/2 Ibs. stewing beef
1 1/4 cups low sodium beef stock
1/4 cup flour
1 can (796ml) low sodium crushed tomatoes
1 large onion, peeled and chopped
2 large potatoes, diced
3 large carrots, chopped
3 cloves garlic, peeled and crushed
2 cups turnip, peeled and diced
3 cups water
fresh thyme or 1 teaspoon dried thyme 
fresh oregano or 1 teaspoon dried oregano
1/2 teaspoon pepper
pinch of salt
1 bay leaf


Preheat the oven to 350ºF.

Combine all the ingredients into a large roasting pan.

Bake for 3 hours. 

Serve with Irish soda bread, dumplings or dinner rolls.

Notes: With 1 hour remaining of the cooking time I added 1/2 cup of frozen peas. You may also try this recipe using chicken or turkey.    

Thursday, 27 October 2016

Chinese 5 Spice Chicken Tray Bake


Short on ingredients and prepared the night before; this chicken tray bake is an easy one. An overnight marinade that is oven roasted with carrots is a delicious healthy meal which is great served with a super green salad or brown rice. 


Chinese 5 Spice Chicken Tray Bake
-------------------------------------------------------------------------------------

6 large skinless, boneless chicken thighs

3 tablespoons vegetable oil
1 - 2 garlic cloves, crushed
2 tablespoons rice vinegar
1 tablespoon low sodium soy sauce
1 tablespoon dark brown sugar
1/4 teaspoon salt
1 tablespoon Chinese 5 spice
1 onion, peeled and quartered 

3 - 4 large carrots, peeled and roughly chopped, add these when chicken is ready to go in the oven.
chopped cilantro or parsley for garnish


In a medium bowl whisk together the oil, garlic, rice vinegar, brown sugar, 5-spice and salt.  Place the chicken pieces and onion slices into a large resealable plastic bag and pour the sauce over top; seal the bag and coat chicken with the sauce. Chill for at least an hour or overnight.

Preheat oven to 400ºF. Line baking tray with baking parchment paper. Remove the chicken from the refrigerator and arrange the pieces on the prepared baking tray. 

Take the prepared carrots and place on the baking tray with the chicken and onions. Roast until the chicken is cooked through and slightly browned, about 30 to 50 minutes.

Remove the tray from the oven and let stand a few minutes. Sprinkle or as I like to call it dress with the chopped parsley or cilantro. 

Notes: I had double the amount of chicken thighs with bone and skin therefore I doubled the recipe although I did cut back on the amount of oil because of this. You may also try adding a selection of chopped veggies as well.   


Hope everyone is having a good week so far. - JD

Tuesday, 25 October 2016

Food Photo of the Day ~ Mug Cakes

I knew this would be the weekend that we would further our mug cake baking skills. Tempting having a cake in a matter of minutes and the kidlets could not resist. My son's mug cake was the classic cocoa with his added touch... marshmallows. Rich chocolate flavour with mountains of gooey marshmallows. 

My daughter's, Nutella, made with almond butter for a fluffy cake. Nutty with a hint of chocolate. A simple yet filling treat!


Hope everyone had a great weekend! - JD 

Wednesday, 28 September 2016

Lorraine Pascale's ~ Fast, Fresh and Easy Food


I have wanted a cookbook by Lorraine Pascale for the longest time. While in England I came across this well designed and organized book of hers. 100 fast, fresh and easy recipes that are accessible and tasty. I made the sweetcorn rice from the book and it had an understated clean taste that was easy to digest. A positive side dish for virtually any meal.

This cookbook is divided into 10 segments or should I say chapters. Each chapter is presented with an inspirational quote and introduction. The one for Cakes + Puds is very fitting: "Everything in moderation... including moderation." - Julia Child. There is something for everyone here. Classics with a spin, simple sides, succulent mains, kitchen staples, and scrumptious afters. Most of the ingredients are accessible and recipes are quick and easy. You will want to make them again and again. Lorraine Pascale takes the guess work out of meal planning by making it quicker and providing a side with the main. She has also provided a handy note at the top the ingredient list for each recipe which states time from start to finish, how many it serves and the equipment you will need. Also recipes are designed with a time plan so that everything, main and side, may be served up together. So many recipes... Crispy Crunch Chicken Strips, Gingerbread Pancakes, Peri Peri Chicken, Chicken, Apple & Cider Casserole, Warm Salmon & Lentils, Spicy Bean Burgers, Walnut Cake, and Peanut Butter Squares! 

This cookbook is inspirational and will satisfy most culinary palates and also is a great addition to one's cookbook collection. 

There is foie gras and then there is this recipe for a vegetarian 'faux gras'. It is a bit different and seems decadent. Which I find very appealing and hope you do to.  


Vegetarian mushroom & port 'faux gras' with tarragon & chestnuts
------------------------------------------------------------------------------------------------------
Time from start to finish: 20 minutes (+ ideally 6 hours in fridge)
Serves: 4
Equipment: Medium frying pan, food processor, 4 x 175ml ramekins

Oil
25g butter
2 shallots
3 garlic cloves
500g chestnut mushrooms
4 tablespoons port (optional)
2 sprigs of fresh tarragon
100g cooked chestnuts (available vac packed or tinned from supermarket)
300g cream cheese
Salt and freshly ground black pepper
Your favourite bread, crackers or breadsticks, to serve

+ Put a drizzle of oil and the butter in a medium frying pan over a low heat.

+ Peel and finely chop the shallots and garlic and add to the pan. Cook for 3 minutes, stirring now and again, until soft and slightly golden.

+ Finely slice the mushrooms. Add them to the pan along with the port, if using, and season with salt and pepper. Turn up the heat to medium and cook for 8 minutes, or until the mushrooms have softened and all their liquid has evaporated.

+ Meanwhile, pick the leaves from one sprig of tarragon, divide the other sprig into four smaller pieces and then roughly chop the chestnuts.

+ Tip the cooked mushroom mixture into a food processor with chestnuts, individual leaves of tarragon and the cream cheese. Blitz for a few minutes until really smooth, scraping down the sides of the bowl once or twice. Have a taste of it and adjust the seasoning if necessary. 

+ Divide between the ramekins, smooth their tops and place a tarragon sprig on top of each to decorate. Arrange them in a small tray or plate, cover with cling film and refrigerate for at least 6 hours or overnight. You can also serve these straight away, but their texture will be much softer and flavour not so intense. Serve with your favourite bread, crackers, or breadsticks. 


Keep it simple. Here is the sweetcorn rice dish I made from the cookbook. Fresh, tasty and so delicious! 


Hope everyone is having a great week so far! - JD