Monday, 29 June 2015

Triple Chocolate Cake

This weekend was an eventful one. It was my son's birthday and he wanted a chocolate... chocolate cake. So I made this three layer triple chocolate cake over the coarse of 3 days, that is really ironic. First, I made the chocolate sponge cake, then I made the two chocolate cake layers and the first batch of chocolate icing. 

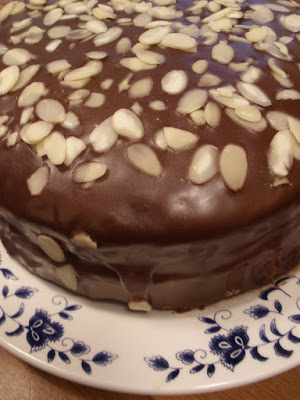
I assembled the cake as follows: I placed one of the chocolate cake layers on a large plate and then covered the top with icing. I then placed the chocolate sponge on top of the iced layer, then I covered the top of the sponge with icing, then I placed the second chocolate cake layer on top of that and iced the top. With the remaining icing I sealed the sides of the cake. The cake was covered and placed into the refrigerator until I could finish the cake the next day. The following day I made another batch of chocolate icing and poured it over the top of the cake, letting it drip down the sides until the cake was smothered with chocolate icing. Sliced almonds were placed on top and the cake went back into the refrigerator to let the icing set for about 2 hours. Which was perfect because by that time we were ready for cake.  

As you can see all the layers came together nicely from top to bottom. The light chocolate layer is the chocolate sponge cake. This cake was rich however not too dense and had the perfect amount of chocolate.  

The icing was very simple to make and I found it had a bit of a fudge consistency. Which was surprising considering it was only two ingredients. Chocolate and whipping cream. This icing is truly a chocolate lovers treat! 

Quick Chocolate Icing
---------------------------------------  
8 ounces of good quality chocolate
1 cup whipping cream

Melt the 8 ounces of chocolate. 

In a saucepan bring the 1 cup of whipping cream to a boil.

Pour the cream into the chocolate and whisk it until smooth, then refrigerate until set... about 4 to 6 hours. 

Notes: I used a bain-marie to melt the chocolate. When using this icing to icing between layers I let it sit on the counter for a bit so that it was a bit pliable and easy to spread. Also, I made two batches of this icing to completely cover the 3 layer chocolate cake I made. The second batch of icing did not set in the refrigerator instead was cooled for a few moments and then poured over the cake. Which then I let set for 2 hours in the refrigerator. 

Hope everyone had a good weekend! - JD 
Friday, 26 June 2015

Food Photo of the Day ~ Build Your Own Salad

build your own salad has become a staple at our dinner table. Even during the winter there are plenty of greens to munch on. Temperatures are rising this weekend and there will be plenty of salad on hand. Keeping things healthy and choosing salad ingredients for maximum veggie impact is a must! Also creating a salad this way is fun for kidlets and a chance for them to choose ingredients and discuss what veggies they like and what veggies they don't like. 

My week has been full. Loads to do and finish up before the kidlets are finished school. Have a good weekend everyone! - JD 

Wednesday, 24 June 2015

The Mustard Club


Can't say I have heard of the Mustard Club. I suppose most things that are enjoyed can be made into a club. Since there is no publication date in the book and if the illustrations are any indication as to the period then it is safe to say this was well produced before my time. The roaring '20's... jazz, cocktails, the speakeasy and mustard, apparently. This 32 page cookbook was published for the Mustard Club by J & J Colman Ltd... the very famous British mustard manufacturer in Norwich, Norfolk, England. British mustard has quite a distinct taste, hot and tangy, than American mustard which is sweet and tangy.

It is a good cook booklet that gives one a strong reminder to look at mustard differently. It is just not a condiment for sandwiches. One can use mustard to braise, stew, bake, cook and taste just about anything. For mustard stimulates the appetite, aids in digestion, and brings out the flavour in food. One of my favourite sandwiches as a child was cheese and mustard. 

Since summer is here and there will be plenty of room for salad I thought I would include a salad dressing recipe and a fun recipe using celery.  


Mustard Dressing
--------------------------------------------
1 gill of olive oil
clove og garlic
1/4 gill vinegar
1 teaspoonful celery salt
1 teaspoon castor sugar
2 teaspoons made mustard
1 teaspoonful salt

Rub the cut clove of garlic in the side of the basin. Mix the celery salt, mustard, sugar and   salt. Add the vinegar and oil and whisk throughly together. 


Celery a la Normande
-----------------------------------------
Shred finely about 5 oz. of the white part of celery, and leave it in cold water for half an hour. Then drain, and add to it two small apples, peeled and chopped fine. Season with Mustard Sauce with Cream.

Mustard Sauce with Cream
----------------------------------------
Put into a bowl a small teaspoonful of made mustard, a pinch of salt, a little pepper and the juice of a quarter lemon. Add very gradually, in the same way as when making mayonnaise, about a gill and a half of cream, stirring all the time. 


Hope everyone is having a good week so far. It is Wednesday, the middle of the week and there are plenty this to do. -JD 

Monday, 22 June 2015

Korean Melon

While at my local shop this week I came across a Korean melon. The friendly lady in the produce section saw my quizzical interest and kindly came over to discuss the fruit. She told me how to ripen and what the inside tasted like. I chose to ripen on my counter for 2 days as opposed to placing in a brown paper bag with a potato on top of the refrigerator as she also suggested. 

Yesterday, I decided to slice it up and serve it with our lovely pancake brunch. The melon seemed juicy and smelt very much like cantaloupe and taste very much like cantaloupe. The enthusiastic produce lady said it had a melon and passionfruit taste. 

This is how the melon looked on the inside. Very similar to a honeydew melon however white rather than pale green. The melon can be eaten whole. We preferred to scooped out the seeds, slice it in long crescent moon shapes, following the nature grid that was provided, and we did not eat the rind. What was left behind went into the compost.

Hope everyone had a great weekend! - JD   

Friday, 19 June 2015

Sloppy Joes


Sloppy Joes are an American classic. Growing up we had them from time to time. I always saw it as a quick, fun... if you didn't mind the lack of structure, meal which my mum could throw together in no time. Now that I am an adult I still view Sloppy Joes in the same way and every now and again fancy one.

While checking out the local organic shop I found a Sloppy Joe seasoning packet. The sodium content was reasonable and so was the price so I bought it. Using the seasoning packet did not necessarily cut down on time it was more convenient. My only issue with this seasoning mixture is that the directions state to "mix packet contents with warm water in a bowl, stirring until completely dissolved" ... since it didn't specify a specific amount of water I just added what I thought would dissolve the spices however I ended up with a thin paste. I was not sure if the warm water activated the seasonings some how or why you would need to water down the seasonings as they were there to give it flavour.   Next time I will opt to make my own seasoning mix. 


1 x Simply Organic Sloppy Joes seasoning packet
1 x 454g ground(mince) meat... usually lean minced beef is used or sometimes minced turkey however I used minced chicken. 
1 x can of tomato paste
1 to 2 carrots, peeled and coarsely grated
1 piece of celery, chopped 
and half a large yellow onion, diced

*You could also add some diced red and green peppers.

Make according to the seasoning package. 

If you do not have a seasoning packet then you will need a combination of the following ingredients. 

1 to 2 teaspoons of chili powder 
Worcestershire sauce 
possibly some mustard
1 can of tomato paste 
1 clove of garlic, peeled and minced
some honey 
balsamic vinegar
salt and pepper

How much or how little will be up to you. My son thought adding some Sriracha sauce would be great too. 

Place a little bit of oil in a large fry pan, add the meat and onions and cook on high heat until the meat and onions are soft. Add the grated carrots and chopped celery or any other veggies you may want to add. Let those cook for a few minutes then add the seasoning sauce you made, from the list of ingredients above, or a seasoning packet, as I did, and let simmer for about 15 minutes. Serve on buns, rolls or try serving it in a wrap. 


Hope everyone had a good week. School is just about finished for my kidlets so these few weeks have been busy ones. Enjoy your weekend! - JD 

Wednesday, 17 June 2015

Making Liqueurs at Home


Summer keeps making an appearance and this quirky cookbook will soothe those summer afternoons and nights with a refreshing and tantalizing liqueur. What could be more gratifying then to serve a homemade liqueur under a summer sunset. Although not all the liqueur recipes in this book are summery. With an estimated 78 recipes there is one for every season and even a few that are quite unique. Like the Green Tomato liqueur or the Artichoke, the Caraway, as in caraway seed, Juniper, Rose, Cantaloupe, and the Green Grape. The possibilities seem endless. 

The author states that he has complied the recipes from his travels to other countries, and contributions are also from family and friends. There is a very brief introduction which talks about liqueurs and how liqueurs are made. This book also suggests that it is inexpensive, fun, and easy to make your own liqueur. On that note, I will share a few recipes from the book to inspire you in possibly making your own liqueur.

RHUBARB LIQUEUR
---------------------------------------
1 cup ground rhubarb stalk
1/2 orange, sliced peeled only
6 artichoke leaves
1 cup sugar
1 cup vodka
4 1/2 cups semi dry white wine

Put the rhubarb, orange peel and artichoke leaves with the vodka in a tightly sealed jar for 5 days. Then dissolve the sugar in the wine and add to the contents of the jar. Mix well and let stand for another 5 days. Strain through a colander and cloth into a glass jar and seal tightly. Set aside in a cool, dark place to mature quietly for 2 more months.

The recipe states that "this is an unusual liqueur with a slight tart after taste that is surprising and pleasant. And that it is best served as an aperitif." 


COCONUT LIQUEUR
----------------------------------
2 cups fresh coconut meat
4 coriander leaves
4 juniper berries
2 1/2 cups brandy
1 cup vodka

Cut the coconut into small pieces and add to rest of ingredients in a glass jar. Seal tightly and leave for 3 weeks in a cool, dark place. Gently shake from time to time. Then strain through a paper filter in to a glass jar and seal tightly. Return to the cool, dark place and leave for 3 months.

The recipe states "this is a dry liqueur having a rich bouquet which is touched with the sweet fragrance of the coconut. It is best served after dinner. "


CHERRY LIQUEUR
-----------------------------------
2 lbs. sweet cherries
1/2 lemon - sliced, peel only
3 1/2 cups sugar
4 cups dry white vermouth

Pull the stems of half the cherries and cut of the other stems near the fruit. Place all the ingredients in a tightly sealed jar and leave for 1 month, shaking occasionally. Then strain through paper filter into a glass jar and sell tightly. Set in a cool, dark place for 6 months. 

This recipe states that " it is an excellent drink to end a meal."

Hope everyone is having a good week. - JD  

Friday, 12 June 2015

Baked & Delicious


And just like the other cookbook from the Dollar store this one offers some good recipes. Giving you a step by step visual guide which can be appreciated and most helpful. Even more helpful when kidlets are cooking or baking in the kitchen. In fact, when I purchased these cookbooks I had my kids in mind. 

Just like it's counterpart, Fast & Simple, the introduction has hints and tips for easy baking and time-saving shortcuts. Again, most of the ingredients one would already have on hand so choosing a recipe will be any easy one. This cookbook offers some classic sweet and savoury recipes. Here is a savoury recipe from the book to try... 

Feta & Olive Biscuits
--------------------------------------------
butter, for greasing
3 1/4 cups all purpose flour
3 tablespoons baking powder
1/4 teaspoon salt
6 tablespoons butter
1/2 cup chopped, pitted black olives
1/3 cup drained and chopped sun-dried tomatoes in oil
1/2 cup crumbled feta cheese
1 cup milk, plus extra for glazing


1. Pre heat the oven to 425ÂşF. Grease a baking sheet. (If not using a non stick coated one or line the baking sheet with parchment paper.)

2. Sift the flour, baking powder and salt into a bowl. Add the butter and rub together until the mixture resembles bread crumbs.

3. Stir in the olives, tomatoes, and feta. Add the milk, a little at a time, and mix to form a soft dough.

4. Roll out on a floured surface to a 1 1/4 inch - thick rectangle. Cut into 2 1/2 - inch squares. Place on the prepared baking sheet, brush with milk, and bake for 12minutes, until golden brown. Serve the biscuits while still warm.

Notes: It is easy to change some of the ingredients to your liking. Like try a different cheese, add green onions, or add some spices.  

Have a great weekend everyone! - JD